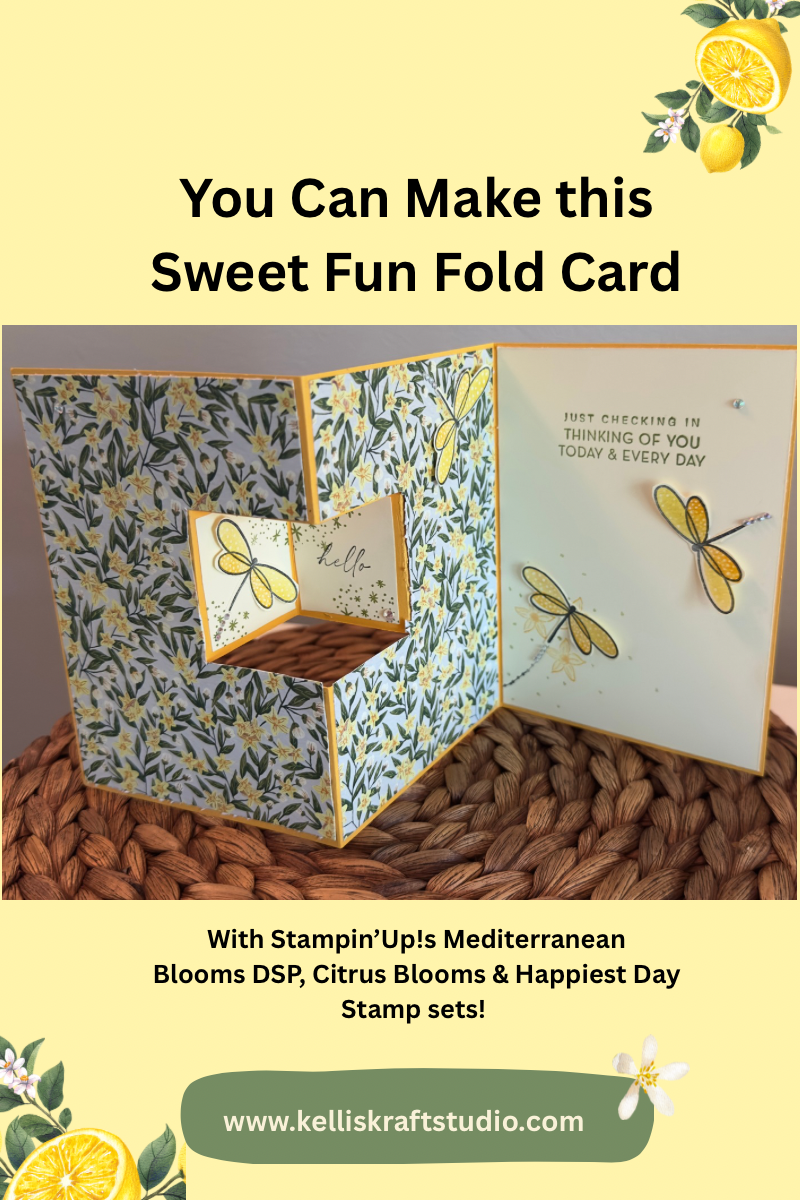
Featuring a POP OUT Window
Hello and welcome back to my studio! First I want to say that I’m so happy you stopped by because you’re going to love how easy and versatile this sweet fun fold card is to make.
You may be asking, “what is a fun fold card?” A fun fold is a term used to describe a card that has different aspects to it. It isn’t the normal 4.25 x 5.5” card nor the 5 x 7” card. Fun folds may contain see through windows, be in the shape of a letter or number or even have steps!
I love making fun fold cards and this one is very easy to make. You’re going to love it! Below I have shared all of the information for how I made this card along with my free diagram, supplies list with links to the exact products I used and the measurements for each step.
REMEMBER
WANT TO SEE MORE?
*** Disclaimer: I do not earn commissions from the sale of any of these products nor do I endorse any of the companies I mention.
Supplies I used
- MEDITERRANEAN BLOOMS DSP by Stampin’Up! https://www.stampinup.com/products/mediterranean-blooms-12-x-12-30-5-x-30-5-cm-designer-series-paper
- CITRUS BLOOMS cling stamp set by Stampin’Up!
- HAPPIEST DAY Photopolymer stamp set by Stampin’Up!
- CARD STOCK 12 x 12” in “yellow”
- INK PADS: Memento Tuxedo Black, “Old Olive” by: Stampin’Up!https://www.stampinup.com/products/classic-stampin-pad-old-olive
- DYE INK PADS in colors: “slippery when wet”, “guppy” by Simon Hurley https://www.scrapbook.com/store/ri-hup69355.html
- TINY RHINESTONES
- CARDSTOCK: “ very vanilla” by Stampin’Up! https://www.stampinup.com/products/very-vanilla-8-1-2-x-11-cardstock
LET’S GET KRAFTY!
CREATE THE BASE OF THE CARD
Right. To make the base of this fun fold card, take a piece of yellow card stock and trim it to 5.5 x 12”. Then score the long side at 4” & 8”. Fold and burnish the score lines and you’ll have a card base with 3 panels that measure 4” by 5.5”.
DECORATE THE CARD BASE
Next, take a 12 by 12” sheet of the Mediterranean Blooms Designer Series Paper- I chose the one you see in the pictures. Trim 2 pieces to 3 14/16” x 5 6/16” or just do as I do and eyeball it to being a bit smaller than the 4 x 5.5” panels of this sweet little fun fold card.
Now, attach these pieces of designer paper to the card base using a temporary adhesive like a temporary tape runner or a couple of pieces of washi tape.
Once the cut out has been made, the designer paper can be permanently adhered to the base. I found this was the easiest way to do this. Trim a piece of “very vanilla” card stock to a bit smaller than 4 x 5.5” for the message on the right hand side of the card. And trim 2 pieces of the very vanilla to 1.5 x 1.75” rectangles to fit inside of the little pop out windows. Set the very vanilla pieces aside.
CREATE THE POP OUT WINDOW
Next, go to the second panel (Panel 2) and measure 2.25” from the right side of that panel and 1.5” down from the top and make a mark. Now measure 2 inches down from the mark you made and make another mark.
This is how the window is created. Fold (Panel 1) and (Panel 2) so that the designer paper is facing you. Lay the card on your trimmer and cut a straight line—through both panel 1 and panel 2–from the outer edge of the card to the marks you made. This creates the little pop out window.
DIAGRAM FOR CARD BASE WITH POP OUT WINDOW

Decorate Your Pop Out Window Card!
Use the little background pattern from the “Happiest Day” stamp set and the “Old Olive” ink pad to stamp the outer corners of the 2 rectangle insert pieces. Then the “hello” sentiment from the “Citrus Blooms” stamp set in the center of the one on the right.
Next, take a scrap piece of very vanilla card stock and stamp the dragonfly image from “Happiest Day” using the Tuxedo Black ink pad, then use the patterned wing stamps and “Guppy”, “Slippery When Wet” ink pads to stamp the colors into the wings.
I adore this stamp set! It’s so useful. Once your dragonflies are complete, fussy cut them out using a pair of snips. Yes, I too wish they had offered a matching punch for this little dragonfly.
Let’s Create the Inside Message
On the blank, 4 x 5.5” very vanilla panel, stamp “Just Checking In” from the “Citrus Blooms”and underneath that the “Thinking of You Today & Every Day” from the “Happiest Day” using the Old Olive ink pad. At the bottom left of the card panel, use the “guppy” ink pad to stamp the flowers from the “Citrus Blooms” set. Adhere this to (Panel 3).
Oh, and don’t forget to adhere your designer paper to Panels 1 and 2. I almost forgot this step on the first card I made.
To finish, adhere the dragonflies, one to the left hand side of the pop out, one to the upper right of Panel 2, one over the top of the stamped flowers on Panel 3. Just add adhesive to the middle of the dragonflies leaving the wings movable.
Finally, fold the card closed and where the empty area is, adhere the final dragonfly. Lastly, add tiny rhinestones to trail behind each dragonfly for a bit of bling. Add more rhinestones or gems as you wish to the panels and you are done!
I hope you have enjoyed creating this sweet fun fold card. I truly enjoy sharing these ideas and makes with you. Be sure to save this in your Pinterest Folder for future makes. This fold is quick, easy and versatile. Any patterned papers, designs and stamp sets will work and I encourage you to take these ideas I share and make them your own. Always remember to Keep it Krafty and until next time, bye bye!