Use your Cricut to make this Brilliant Father’s Day Card!
Hello and welcome to my studio! I’m so happy you are here. Today’s project is this brilliant Father’s Day card. This entire card comes together quickly and easily thanks to Cricut!
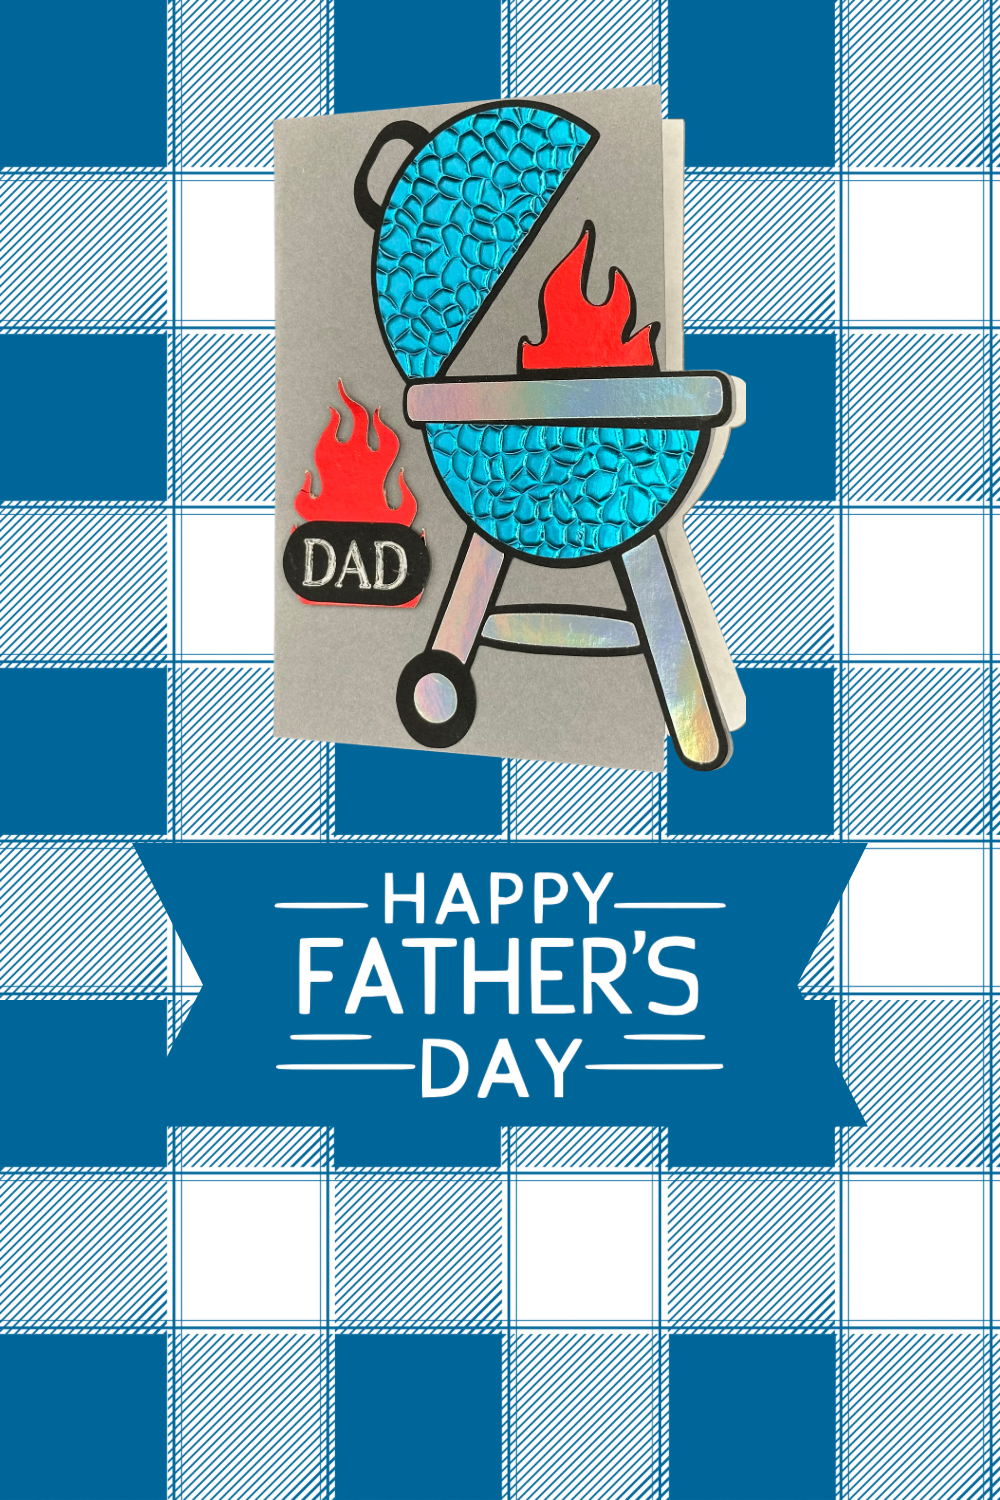
I’m sharing my FREE design with you! All you have to do is use my link to Cricut Design Space. Choose the colors and types of card stock you want to use. Allow Cricut to make the cut. Adhere the cut images to the cool grill-shaped card base and that’s it.
The edge of the card follows the contour of the grill and this creates a unique card base. Handmade cards are a great way to share our love, celebrate a special day and save a bit of cash while we’re at it.
This card comes together with just a few simple supplies. I’ve shared my list of supplies below. You can use the inside message I created or just write your own heartfelt messages. You can also change the inside message with your Cricut. I’ll explain more about this. I decided to go with an amusing pun for this card~ “You’re a Rare find Dad, Well Done! Happy Father’s Day”. Another idea I had was “You keep our family gatherings SIZZLING! Happy Father’s Day!”
REMEMBER
WANT TO SEE MORE?
SUPPLIES I USED FOR THIS PROJECT
- 80 LB CARD STOCK: SLATE GRAY
- 65 LB CARD STOCK: BLACK
- FOILED CARD STOCK: BLUE, RED, SILVER http://Recollections Foil Cardstock Paper https://a.co/d/4AGZedz
- PLAIN WHITE PRINTER PAPER or WHITE CARD STOCK
- CRICUT GLITTER GEL PEN: SILVER
- CRICUT PEN: BLACK
- CRICUT EXPLORE AIR 2
- 3D EMBOSSING FOLDER: HAMMERED METAL by (Stampin’Up!)
- GLUE
LET’S GET KRAFTY!
Right, let’s do this! Gather your supplies. Remember, you don’t have to use the exact same supplies I used unless you want your card to look exactly like mine. The card will still be very cute using regular card stock instead of foiled card stock. I already had plenty of foiled card stock on hand and I wanted the grill and the fire to really shine so I used that.
I used a 3D embossing folder “ hammered metal” to add texture to the blue parts of the grill. Again, that’s totally optional. If you don’t have any embossing folders, no worries. If you have another embossing folder that would add texture, just use that. There’s no wrong way to do this.
I used the Cricut glitter gel pen in Slot A of the Cricut so the machine could write “DAD” and cut out the oval piece. I used plain white printer paper for the inside message but you could use white card stock instead. The 80 lb gray card stock I used for the base is so thick, I decided thin paper was better for the inside.
CRICUT DESIGN SPACE
Here’s the link to my FREE Design in Cricut Design Space. Once you open the link, you have the choice to click “Make It” or “Customize”. Click “Customize” if you’d like to change the size or have Cricut to write a different message for the inside.
CDS LINK: https://design.cricut.com/landing/project-detail/68473aecd32a2bf69ad1efd2
MAKING THE CUT

Once you have clicked on “Make It”, you will be redirected to the cutting preview.


Assembling Your Card
Once your Cricut has cut all of the layers of this card, remove the pieces. Lay out the pieces on your work surface. Fold the Card base in half making sure to align the edges so the grill shape is perfectly aligned.
Take the black base layer of the grill and add all of your decorative pieces onto it with a bit of glue. This part is so much fun. It works exactly the same way as when we use etched dies from companies like Spellbinders, Sizzix… We “build” the grill with card stock! I love it.
To finish, adhere the completed grill to the front of the card, aligning the edges onto the base. Refer to the pictures to see how. Then remember to adhere the red foiled flame to the black layer of the fire, then add to the grill. Adhere the “DAD” oval to the larger flame and then add to the front of the card.
Remember to add the message to the inside of the card. If you wish to change what the message says, and you want the Cricut to write it for you, just delete my message and use the Text function to write your own. Remember to “ATTACH” the text to the paper where you want Cricut to write it.
ADMIRING YOUR CARD
Your uniquely shaped, bright and shiny, aka brilliant Father’s Day Edge card is complete! Now sit back and look at your creation. Card making is an incredibly enjoyable project for seasoned and novice crafters alike. The end result is quite rewarding. Your recipient will feel cherished knowing you took the time to make them such a one of a kind Father’s Day card.
You could easily change the “DAD” sentiment to anything you wish. Perhaps you’d like to give this to “Grandpa”, “Name”, “Brother”. You could easily use this card as a birthday card by simply leaving out or changing the sentiment on the front of the card and the message inside. The possibilities are endless!
I hope you have enjoyed today’s project. Cricut is such an asset for countless craft projects like this Father’s Day Edge card! This is the very first card of this design I’ve made and I look forward to creating more edge designs in the near future.

If you’d like to see some of the other projects I’ve made, go to my latest blog posts in the menu at the top of the page. I craft all sorts from wreaths, candles, t-shirts and more to paper crafting. Paper crafts, like greeting cards and boxes and bags, are my favorite. Just remember to take my ideas and make them your own and always Keep it Krafty!
Happy Father’s Day!