Using the Cricut and HTV
Hello and welcome to my studio! Today I am going to share how you can quickly and easily make an adorable St. Patrick’s Day tee for your toddler. Want to make some larger sizes? Just use my designs that I’ll share the link to in Cricut Design Space and scale to size! We don’t want our little ones to get pinched for not wearing any green on St. Patrick’s Day, March 17. These darling tees come together in no time at all and if you’re like me, you’ll be looking for more tees to make because it’s kind of addictive. I bought these 2T and 3T tees at Michaels for about $3 so this is a frugal and fun project! I’ll share the links to items I used to make these tees in my Supplies List. St. Patrick’s Day isn’t a huge event here in the US but I love to celebrate it. Any time I have an excuse to entertain, create cute things to gift my guests, cook and bake, I’m a happy person!
** Disclaimer: I do not earn commissions from any of the products I mention.
SUPPLIES FOR THIS PROJECT
- CRICUT MACHINE
- HEAT TRANSFER VINYL( HTV) : HTVRONT ( ST. PATRICK’S DAY )https://a.co/d/6cYsY3w
- T-SHIRTS: (WHITE) MICHAELS STORES. https://www.michaels.com/product/10508504
- HOME IRON OR HEAT PRESS: HTVRONT: https://a.co/d/hatqvqQ
..
LET’S GET KRAFTY!
Right, so gather all of your supplies. The Heat Transfer Vinyl I used for this project is the St. Patrick’s Day package from HTVRONT that includes several shades of green, glitter gold, glitter green, black and white. This is my first time using this product and I love it! It cuts perfectly and weeds beautifully and is quite economical. This was my first time ever using the HTVRONT Heat Press. Fabulous! 10 out of 10 I do recommend. However, you can certainly use any HTV you choose and any heat press or home iron. I used a home iron for my projects for several years and that always worked for me. I decided to buy a heat press when I started to make more HTV projects and it helps me to regulate the temperature and pressure for each type of HTV I choose to use.
If you wish to use my free designs, here’s a link to my designs in Cricut Design Space.
For the Wee Lad: https://design.cricut.com/landing/project-detail/67c675adcc12f4c4f63d046d
For the Wee Lass: https://design.cricut.com/landing/project-detail/67ba5214e924f4d44b4b2f72
Go ahead and click on the link for whichever tees you plan to make. Choose your vinyl colors.


For each design your Cricut will set up the cuts in layers. So, you’ll add the vinyl to the cutting mat as per the CDS screen. Once the cut is made, you will remove all the vinyl that will not be ironed on, aka weeding your vinyl designs. This vinyl cut and weeded like a dream. If you are new to using vinyl, you’ll learn that not all vinyl is the same.

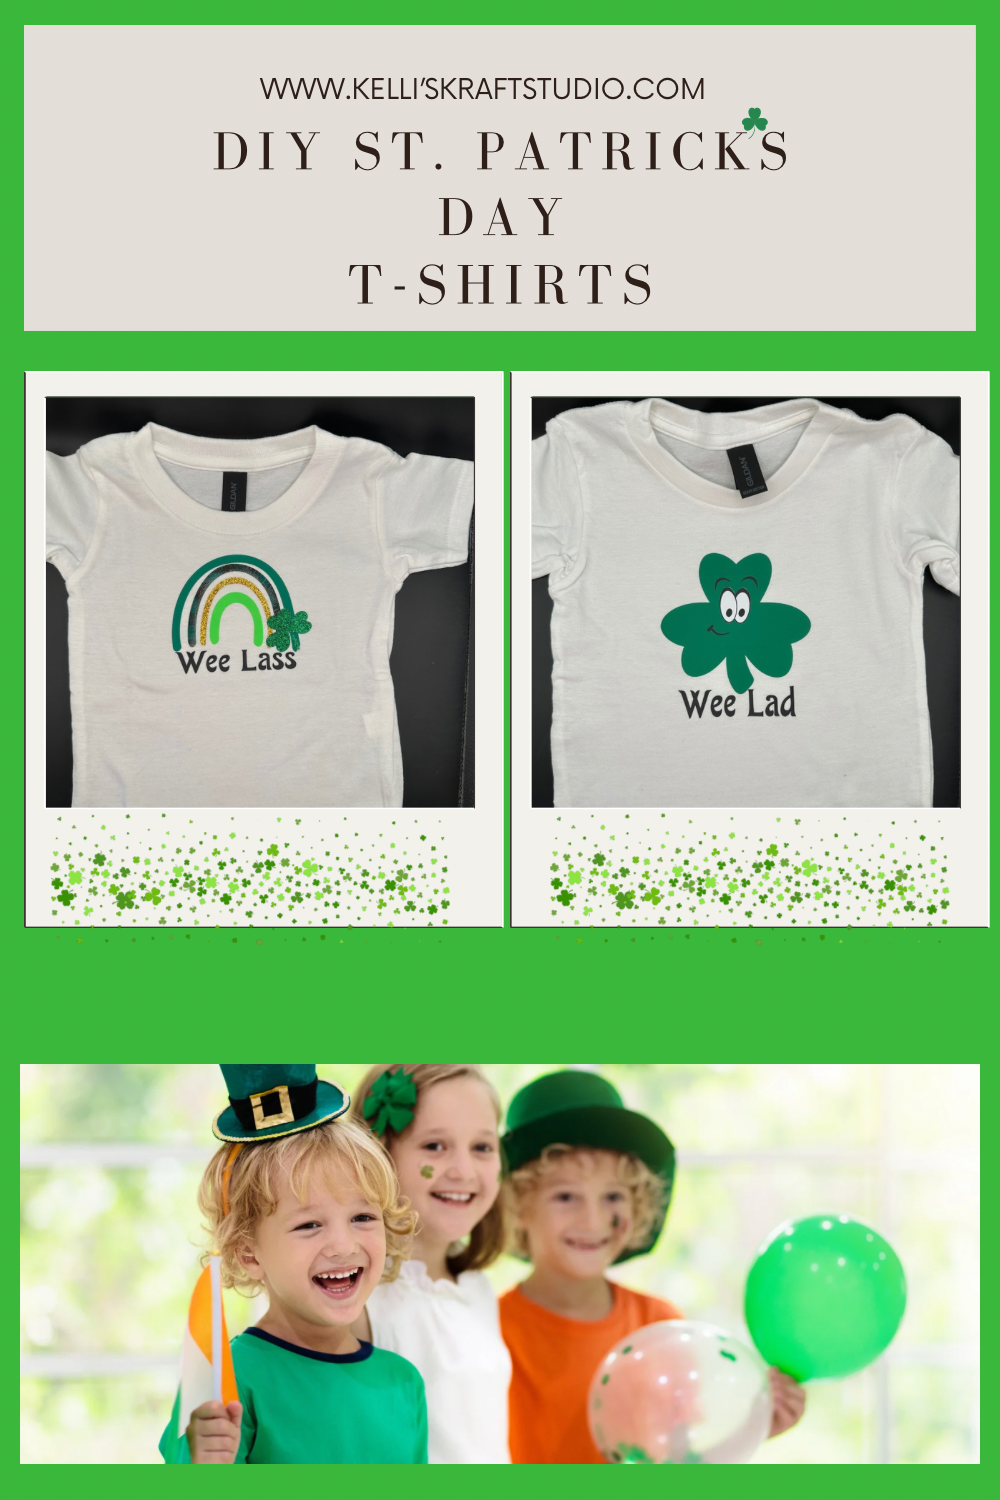
For the rainbow tee, I started with the largest arc and pressed it on then worked my way to the smallest. It’s a solid dark green, then a plaid green, glitter gold, light green. The “Wee Lass” is in black and I finished off with the shamrock in glitter green. There will be 6 layers for this design. The link will take you to my exact design and this size works for 2T-3T. If you wish to make it larger or smaller, simply scale the design. There’s a helpful template at the bottom right of the canvas of Cricut Design Space to help you size your images.

Remember to MIRROR your designs on the Mats page. For this project you’d only need to mirror the “Wee Lass”. But I always go ahead and mirror all of the images for any Heat Transfer Vinyl project.

For the “Wee Lad” design, remember to mirror each layer. Transfer the green shamrock. Then the white layer of the eyes. Then the black layer of the eyes. Then the “Wee Lad” There will be 4 layers in total. It’s so much fun!

Apply the white layer first. Then the black layer of the “face” then the “Wee Lad”. By the way, when I was weeding the face design, I accidentally removed the little black “pupils”. I realized what I did and was able to save them and add them at the right time. This happens so don’t worry. Even if I had discarded the pupils, I could have recut the “face” layer. As you can see, we use a small portion of each page of vinyl for these projects. So I estimate my cost for these tees to be around $3.50 at the most. The little ones are going to look so cute and festive in these St. Patrick’s Day tees!
Thank you for visiting my studio today. I loved making these little t-shirts. If you are a seasoned crafter who makes loads of tees, I hope this brings you inspiration. If you are new to or thinking about using your Cricut and heat transfer vinyl, I hope this has been helpful. These designs are pretty simple and very rewarding so if you are looking for a project to start with, give it a try! We all had to start somewhere, and I’m sure glad I did. Just remember to take an idea and make it your own and always keep it krafty!
I’ll be sharing more spring and summer projects soon, so follow me on Pinterest and visit my website @ www.kelliskraftstudio.com. You can visit my “Latest Project Tutorials” page to see some of my latest projects. See you soon! Bye Bye!