Featuring “Share a Milkshake” by Stampin’Up!
Let’s Make a Card for Valentine’s Day!
H
ELLO and Welcome to my studio! I love fun fold greeting cards and was recently inspired by a double Z fold card. Actually, it isn’t a new idea as crafters and card makers have been making them for a few years and I too have made them before. I often forget about different styles of cards and when I want to change it up a bit I look to other crafters for inspiration. I recently received the “Share a Milkshake” bundle -sold by Stampin’Up! – from a friend and as usual I want to play with a new stamp and die set right away. Valentine’s Day is just around the corner so I just knew I had to make some cards using my new stamp set and utilizing that amazing double Z fun fold. Once I could work out the dimensions, this card came together perfectly. The stamp and die set is so much fun! This set is incredibly versatile and I will be using it for many future occasions. It can be used for birthdays, Christmas, Easter, St. Patrick’s Day, Halloween and is absolutely perfect for Valentine’s Day!
** Disclaimer: I do not earn commissions from nor do I endorse any of the companies I mention or products I use.


Supplies I Used to Make this Card
- 80 lb black cardstock and white cardstock
- 80 lb cardstock -My Colors Cardstock-by PhotoPlay- Anchors Aweigh Collection ( this is a beautiful line of cardstock- I purchased from Scrapbook.com ) the Caribbean Sea color
- Yellow and tan cardstock- My Colors Cardstock-by PhotoPlay
- Prom Queen Ink Pad by Simon Hurley
- white embossing powder- not necessary- can use white cardstock
- a nesting labels die set- any will work-
- sparkle gems
- Share a Milkshake stamp and die sets – Stampin’Up!
Let’s Do This
Base #1:
Trim a piece of black cardstock to 4.25 x 11” and score @ 2.75” and 5.5” Now, fold and burnish your score lines. Trim a piece of the Caribbean Sea card stock to 4 x 5.25” and two pieces 2.5 x 4”. Next, grab the yellow cardstock and trim it to 3.75 x 5” and two pieces to 2.25 x 3.75”. Basically you just step each panel down by a quarter of an inch. This is what will make the supporting base of the card.
Base #2:
Trim a piece of black cardstock to 3.5 by 9.75 inches and score at 2.75 and 5.5”. Fold and burnish your score lines. Take a piece of the Caribbean Sea cardstock and trim it to 3.5 x 4” and two pieces to 3.25 x 2.5”. Take some of the yellow cardstock and use the nested labels dies to die cut 3 shapes that will fit inside the Caribbean Sea panels. You can use any shape dies you have here or simply trim the yellow to fit inside each panel.
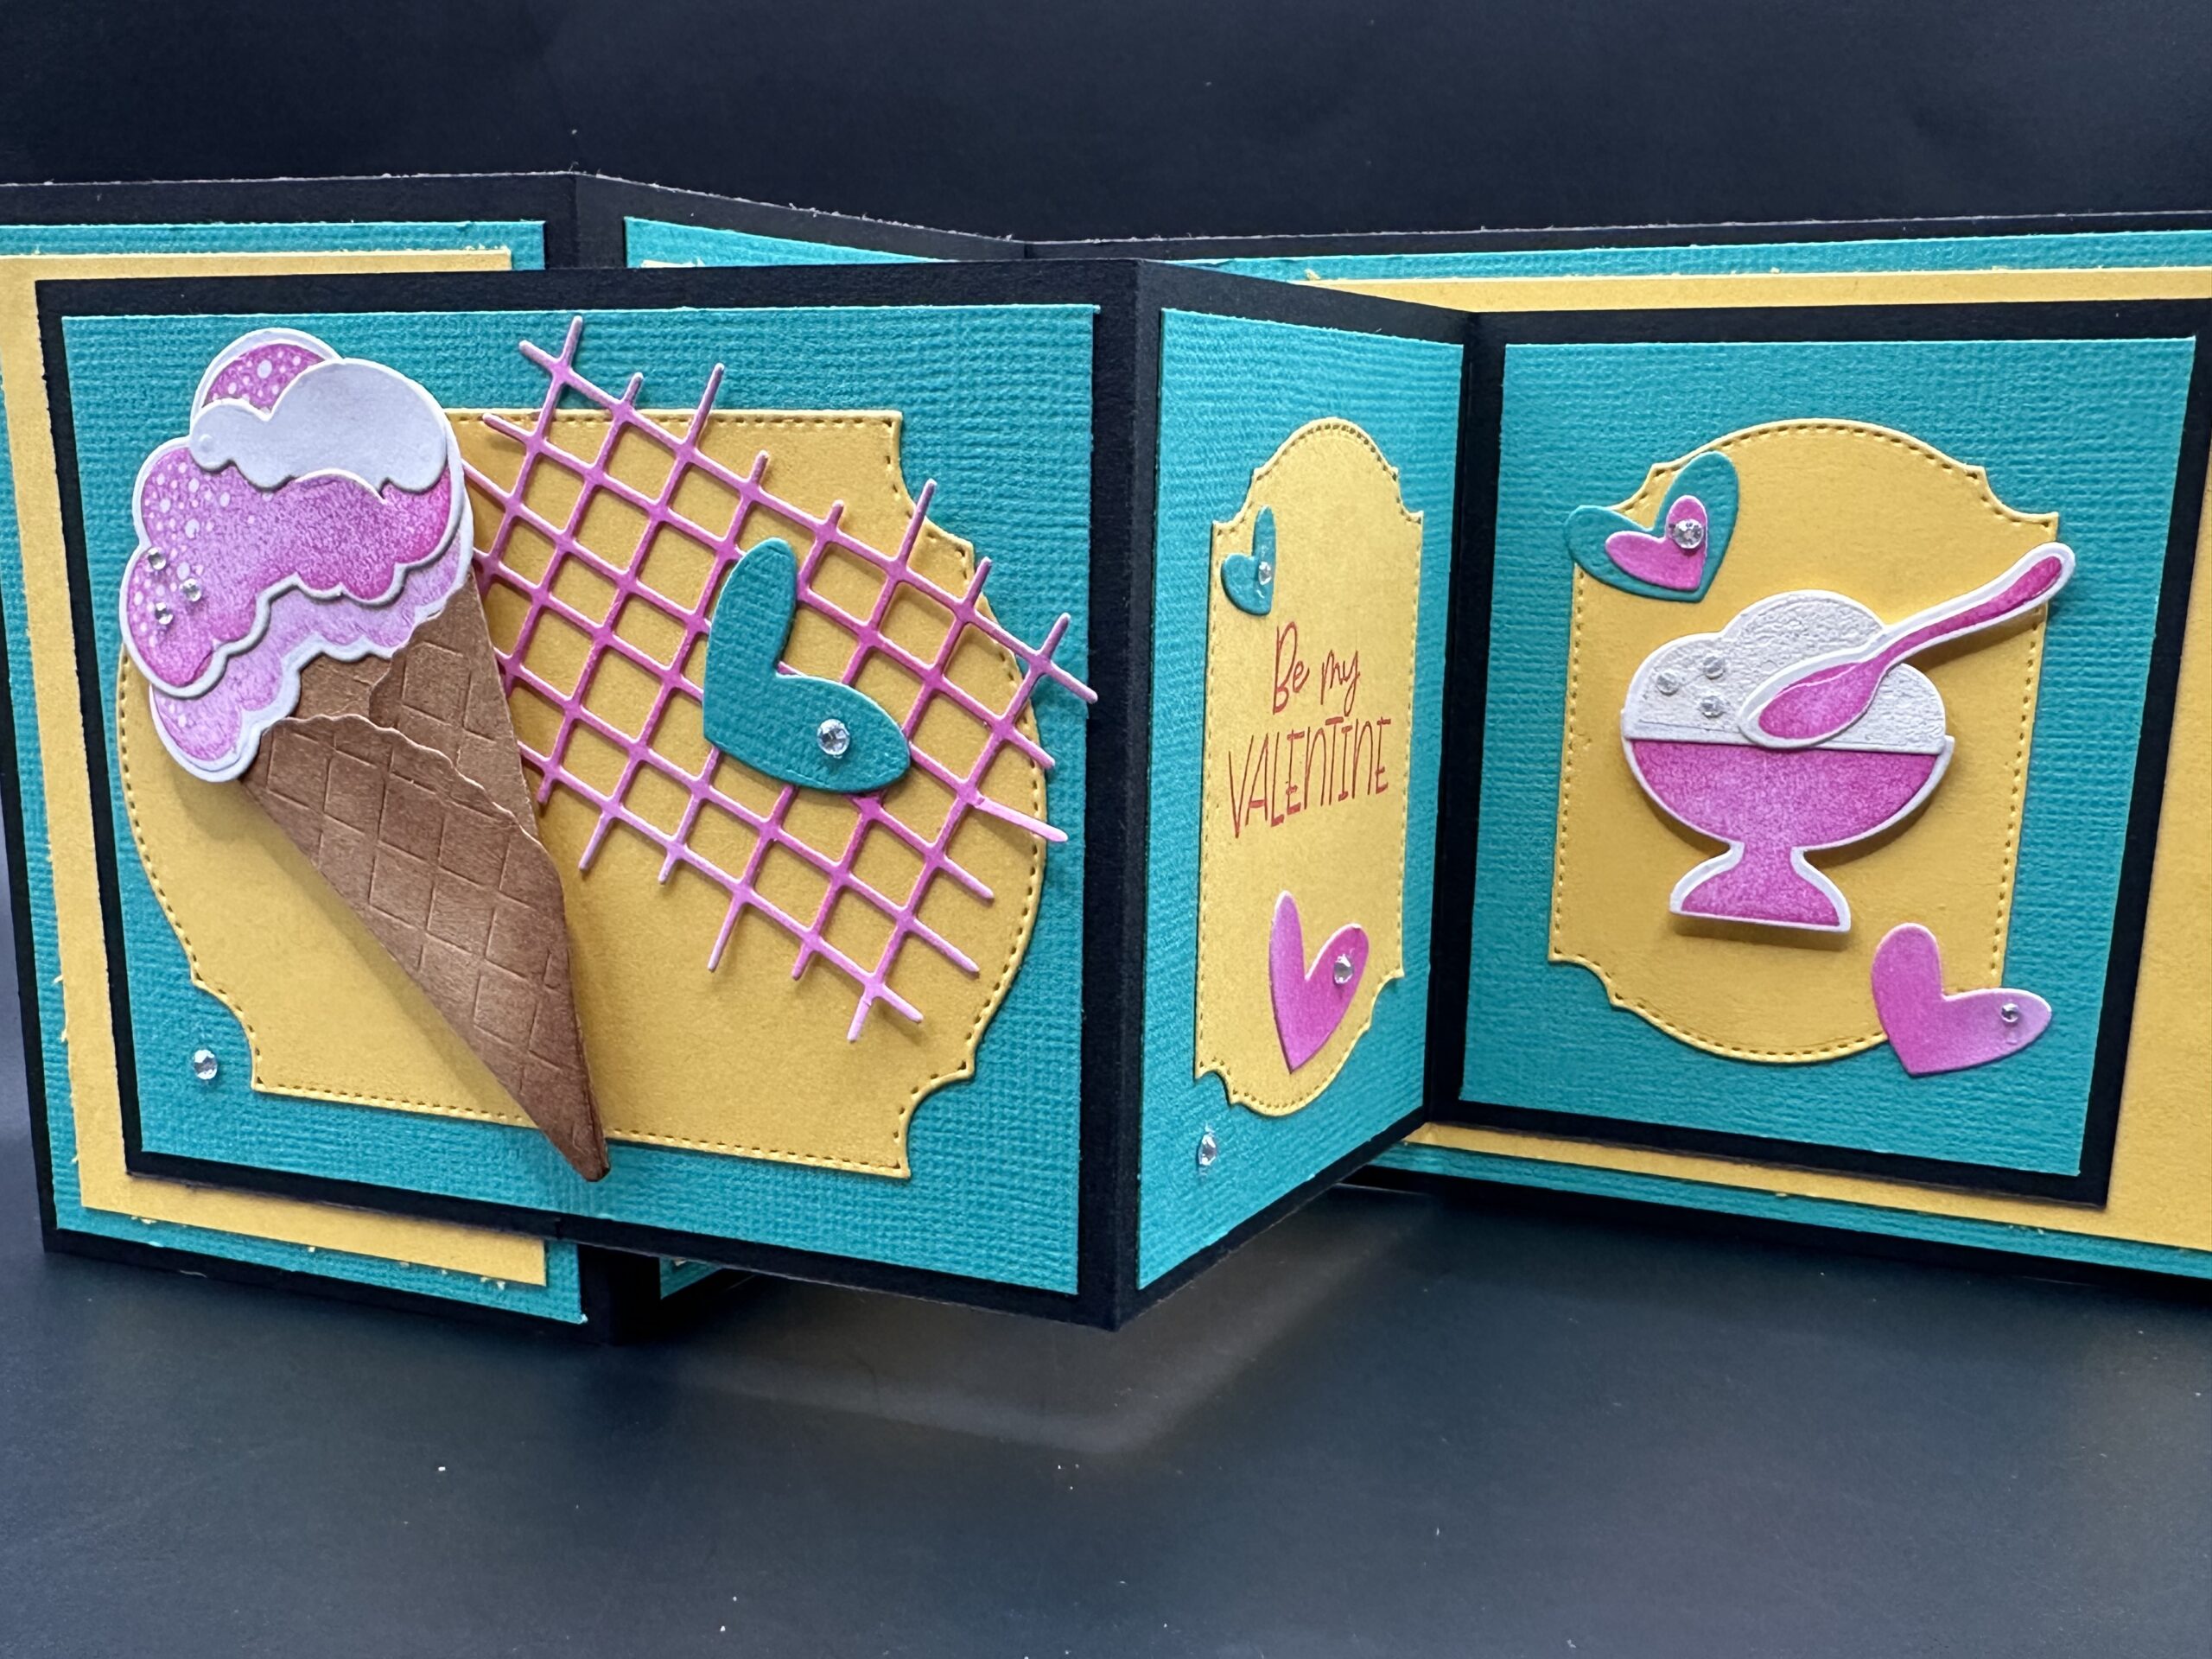
Now that all of the paper has been trimmed to size, adhere the layers onto their respective black bases. It’s time for the really fun part! Take out your “Share a Milkshake” bundle, your pink ink pad and a piece of white cardstock. Stamp the ice cream scoops, the bowl, spoon and hearts using the Prom Queen ink pad, or any pinkish ink you have on hand, and die cut these.
I used some white embossing powder and embossed the white scoop of ice cream for the bowl but that isn’t necessary, you can just die cut the scoop from a scrap of white CS. Take a piece of the Caribbean Sea cardstock and die cut some hearts. I used the prom queen ink and blended some of it onto a piece of white CS with a foam blender brush, then die cut that “lattice-like” shape for the card. Now stamp the sentiment “Be my Valentine” onto the yellow label panel- I chose to stamp the middle panel.
Die cut the waffle cone from a piece of tan CS, fold it up on the scored sides and shade it around the edges with some brown ink to give it a bit of dimension. Die cut the little whipped cream shape from a scrap of white CS. Glue the 2 ice cream scoops and whipped cream onto the waffle cone. Glue the white ice cream scoop and pink spoon onto the bowl. Now all of our elements that remind me of an ice cream parlor are ready to adhere to our Base # 2, the smaller base. Take the “lattice” shape- I don’t know what to call it but it is fantastic -and adhere it to the largest yellow label panel as in the photos, use some foam adhesive dots to raise the ice cream cone and adhere it to the same panel. Adhere the bowl of ice cream to the far right side panel and the “be my Valentine” to the middle. Now take the die cut hearts and adhere them to the card wherever looks cute to you and add some bling if you’d like. The last step is to attach the smaller base to the larger base so that the end result – as it’s folded – will be an A2 (4.25” by 5.5”) Valentine’s Day card. This card lays out in the landscape design, but the easiest way to attach the two Z fold layers is to turn them to portrait, and line up the panel that has the ice cream bowl with the largest panel on Base # 1. Measure up about half an inch from the bottom and adhere the smaller panel to the larger panel. SEE PHOTOS. Close up the card and adhere the other side. Careful here, just put the glue at the top of your rectangular panel. You have now made a Double Z fold Valentine Card that is bright and cheerful and full of fun. It stands up beautifully! I just keep walking by and looking at it.
I very much enjoyed making this card and am excited I could share it with you. If I could, I’d make one for everyone I know. I have people in my life that will love this color combination as they’re not big fans of the typical “Valentine” colors, so I thought these bright colors would be a delightful change. I can soooo see this as a birthday card – only changing the sentiment. I think this stamp and die set was in the Stampin’Up! Catalog a couple of years ago but it’s easy to find by other sellers online as it seems very popular. I really appreciate that people buy a bit of extra products from companies’ rubber stamp lines and then have them to sell to us later. I for one don’t know about each and every product that is introduced and even if I did, I could never buy them all- since I’d want all of them – at the very time they are offered. Where would I ever keep millions of stamps, dies and papers anyway?
Thank you for joining me today at Kelli’s Kraft Studio. You can follow me on Pinterest and see other blog posts. I use products from several companies and I just love them. I hope you enjoyed this Valentine’s Day Double Z Fun Fold card and give it a try. I had so much fun making this card, I love the layout and I adore the stamp set with all of the fun ice cream elements! You can make a Double Z Fold greeting card using many other stamp sets so you should give it a try! I’ll be making more fun Valentine’s Day projects in the coming weeks, so keep an eye on my blog. See you soon!