
Featuring “Postage Collage” by Waffle Flower
Hello and welcome to my studio! I am so happy you are here so I can share with you this adorable “Christmas in July” Party Invitation. Yes, in recent years, I have been having small parties in July with a “Christmas in July” theme. I’m still collecting bits of decorations for the occasion. Of course, I craft lots of my decorations. Since I am a paper crafter, it stands to reason that I’d make my own invitations for this party. I am in love with the Postage Collage collection by Waffle Flower. This product is incredibly versatile and will be a cherished addition to my craft room for many years to come.
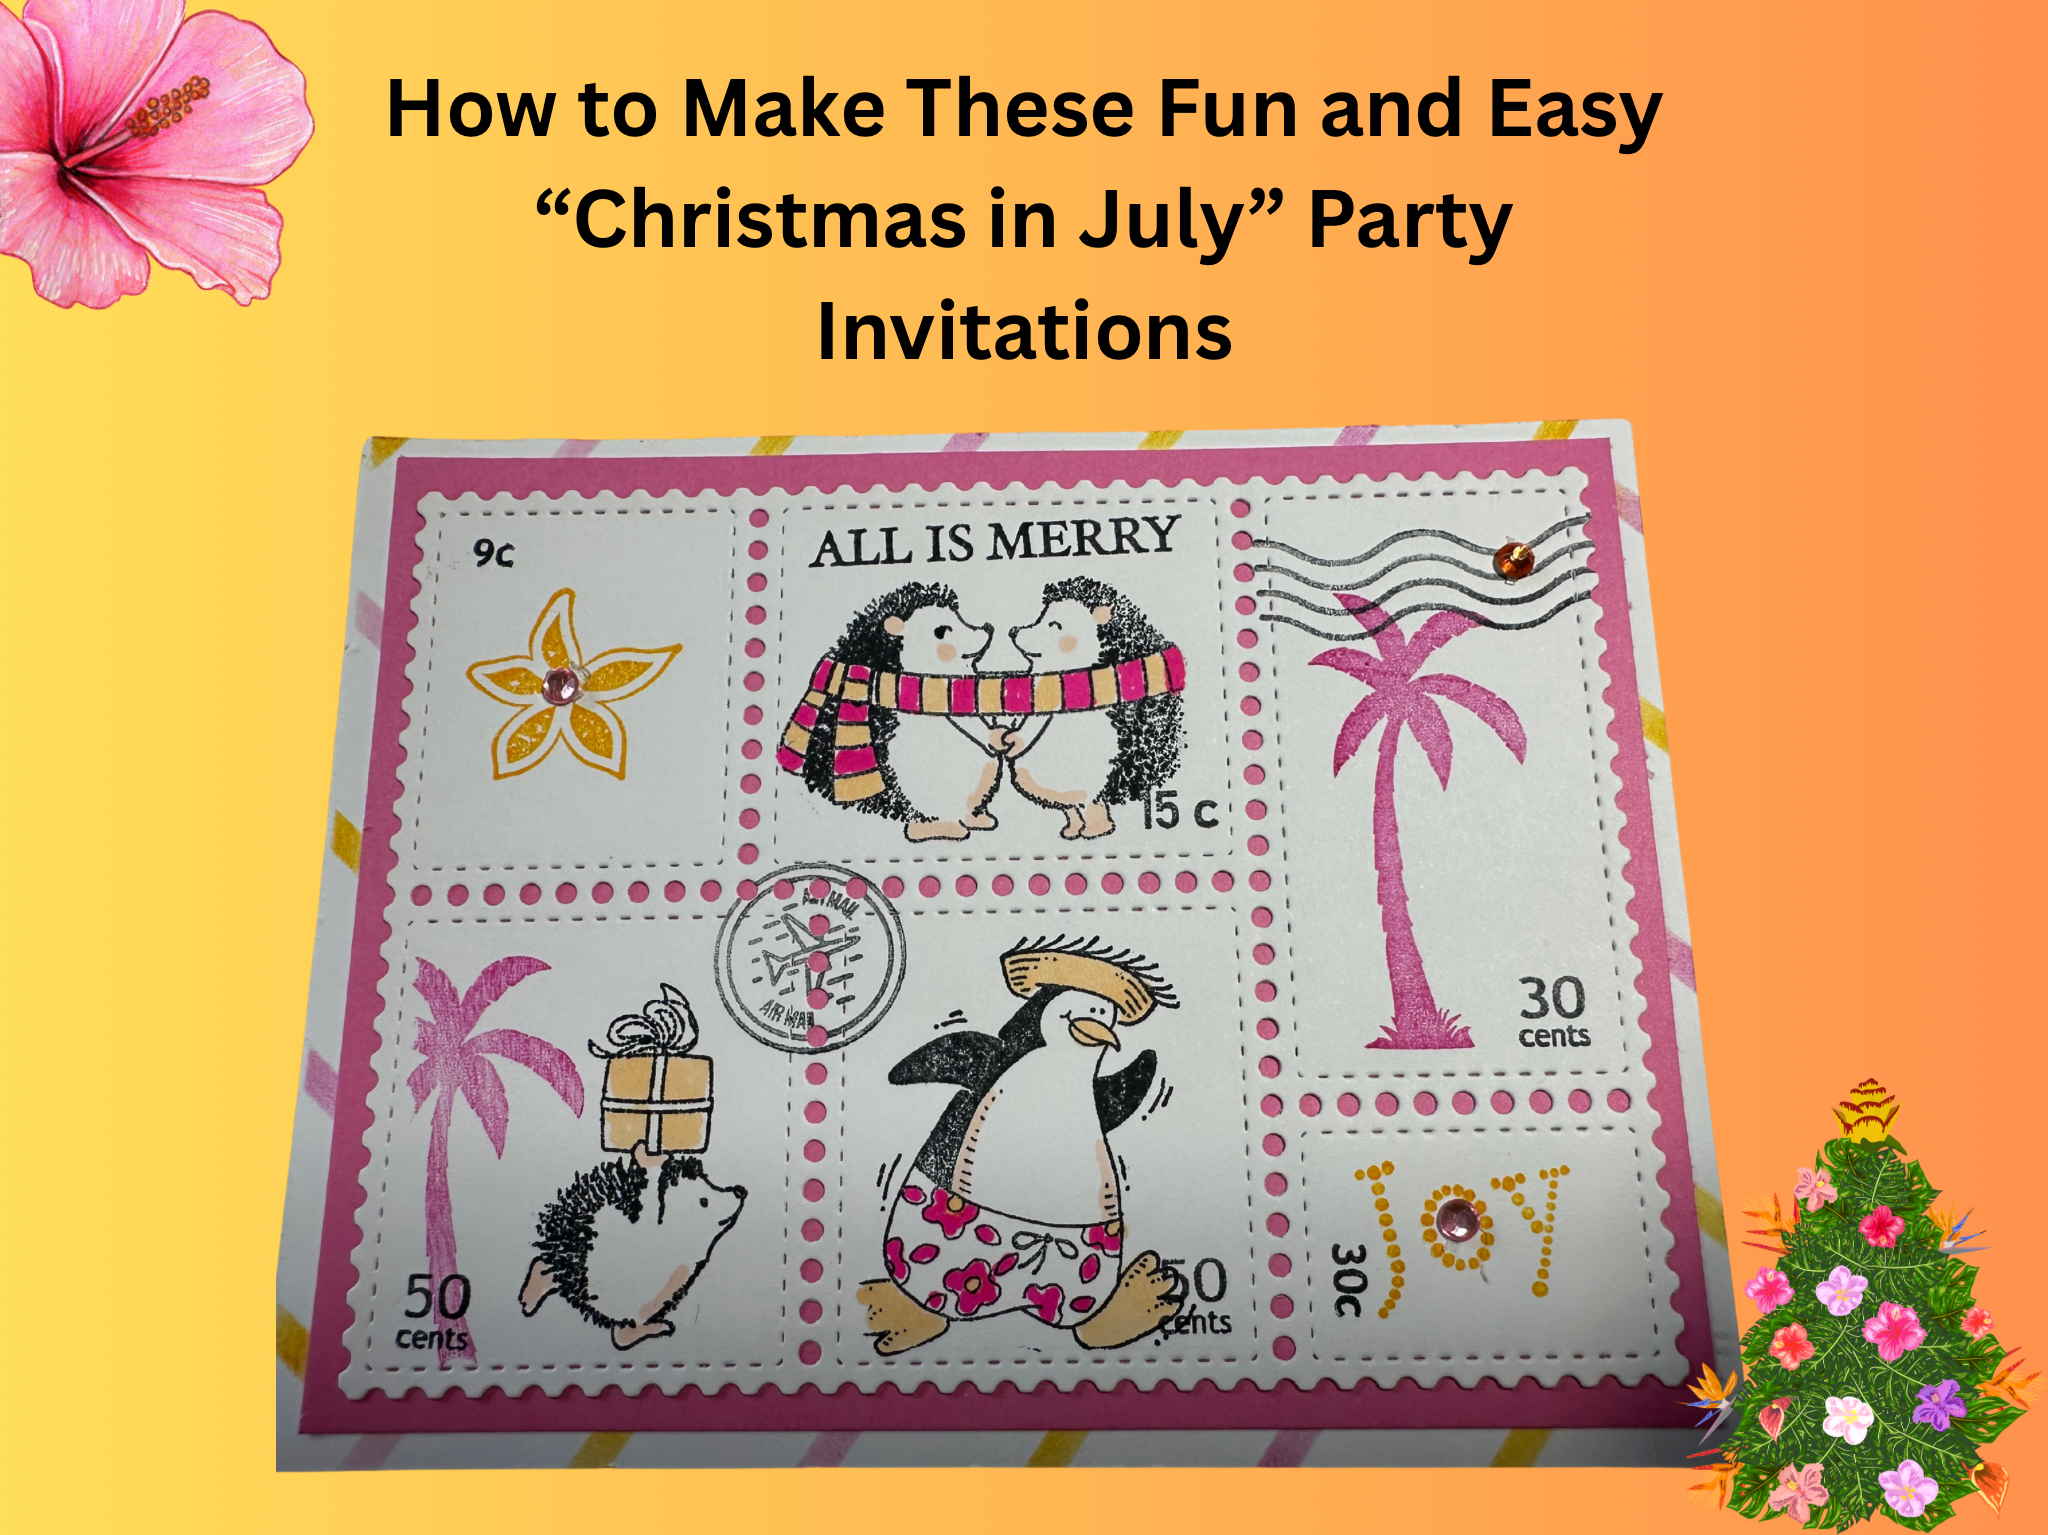
I received the Postage Collage die from a friend and fell in love with it immediately. I quickly went through all of my stamps to see what would fit inside the lovely little “stamp” boxes. Most of us have lots of little stamps that will work with the die. However, I wanted more and more I found. Check out Waffle Flower to see what all they have to offer for this collection. I used the die, coloring stencil, Tropical Sunset Stamps and more to create this adorable “Christmas in July” party invitation. Keep reading below so see the list of supplies and a few helpful steps to creating this invite.

List of Supplies
- Postage Collage Die by Waffle Flower http://Waffle Flower Postage Collage Die https://a.co/d/a40M0U3
- Postage Collage Stamp Set by Waffle Flower https://www.scrapbook.com/store/wfc-421381.html
- Postage Collage Tropical Sunset Stamps by Waffle Flower
- https://www.scrapbook.com/store/wfc-422014.html
- Postage Collage Coloring Stencil by Waffle Flower https://www.scrapbook.com/store/wfc-421726.html
- Hedge Hog Stamps http://GLOBLELAND Hedgehog and Animal Clear Stamps for DIY Scrapbooking Decor Friend Swing Transparent Silicone Stamp for Making Cards Photo Album Decor https://a.co/d/gThMKfF
- Penguin from the “Penguin Paradise” stamp set: retired Stampin’Up!
- Tropical Flower from retired Stampin’Up! Product
- ”JOY” stamp
- Misty Stamping Tool optional but helpful https://www.scrapbook.com/store/msp-49600.html
- Cardstock in colors: white, pink
- Ink pads in colors: pink, orange, black
- Alcohol Markers in colors: pink and orange
- ”ALL IS MERRY” from the “Hang an Ornament” stamp set by Stampin’Up!
Let’s Get Krafty
Right, as you can see, I’ve used several stamps from different sets to create this Christmas in July party invitation. It is so much fun! I used the Misty Stamping Tool to help me with this and it is very helpful indeed. It holds the cardstock in place for stenciling and stamping. It’s optional but like I said, helpful. Keep reading below and I’ll share the steps I made to create this party invitation.
Gather your supplies and trim a piece of white card stock to about 6 x 6”. This will be stenciled using the “Postcard” border and trimmed down to 4.25 x 5.5”. This is the base of the invitation. Trim another piece of white card stock to about 6×6”. This is the piece you will stamp on and then die cut. Trim a piece of pink or orange card stock to 4 x 5.25” for the background.
Kraft it
- Take the white CS and place securely on your work surface( I placed mine in the Misti -held with magnets). Use the Postcard border from the coloring stencil to create your border. I used pink and orange ink pads and a foam blending tool for this. Trim this down to 4.25 x 5.5”. This is the base of your invitation.
- Take another piece of white CS placed securely and use the coloring stencil as a guide to where you will be stamping. You can place this in any direction you wish.
- Plan which stamps you will use inside your little postage blocks and orient your stencil accordingly. ( For my invitations, I didn’t color in the blocks, I just used the coloring stencil for stamp placement guidance).
- Stamp your images into the little squares and rectangles. See my images below for a bit of inspiration. This is where the Misti is so helpful. Not only does it hold the stencils in place but you can place your stamps and stamp. If the stamp didn’t ink as you’d like, you can re-stamp easily because it’s held perfectly in place. { again- this is not required, just helpful }.
- Now, use the Postage Collage Die and die cut the decorated panel.
- Use alcohol markers or colored pencils to color in any elements you wish. I colored the scarf, present, shorts and hat with orange and pink alcohol markers.
- Now, take the Postage Collage Postage Stamps and black ink to stamp the mailing symbols wherever you like. See my photos for inspiration. I love the little “30cents and 50 c… stamps” it just brings the whole thing together!
- Lastly, adhere your pink 4 x 5.25” background CS to the 4.25 x 5.5” postcard stenciled base. Then adhere the die-cut to the pink CS. Embellish with little gems or dots if you wish and that’s it!
Remember: Follow me on Pinterest and Save this Pin


Want more card making & crafting inspiration?
Follow me on social media
Creating the Invitation
Finally, for the backside of these invitations, I used CANVA to create the invite, printed it out and trimmed to 4 x 5.25”. You can hand write your invitations or you can use Google Docs or whatever you like to make the invite information. On the left side it says, “you are invited to join us for our Christmas in July celebration. Just bring your knickers and a healthy appetite” The Time and Place is on the right. You could stamp some images at the top right or use some themed stickers.
Keeping it Krafty
Thank you for joining me today in making these adorable “Christmas in July” party invitations! Of course, you can always use this same idea and make it a greeting card front instead. Waffle Flower has lots more stamps that go with this theme. I’ve seen ( and a-hem, have on my wishlist ) Christmas, Halloween, beach, coastal, spring, forest… the list is a long one. Take a look at what all they have to offer! I can’t wait to add to my collection. Their products can be found on their website, Scrapbook.com and more. I have seen some for offer on Amazon as well. Whatever you decide to do just remember to make it your own and always keep it krafty!
