
Thank You Card
for Christmas Gifts
Part of the charm of paper crafting greeting cards is the nostalgia of tradition for some and the retro/new idea for others. Thank You cards are a lovely way to thank someone for their kindness and or gifts. This too has seemed a lost art. We see the greeting cards in stores but there’s been a huge boom in hand crafted greeting cards for the past 15 to 20 years and it doesn’t seem to be fading out any time soon. People love receiving hand made cards and crafters adore making them so it’s a win win. Hand crafted cards are so popular that you can find thousands for sale on sites like Etsy. I have also noticed big card companies like Hallmark and American Greetings are trying to jump on the bandwagon making their cards appear to have a hand crafted element. So, as I say, “Krafters- let’s get Krafty!”
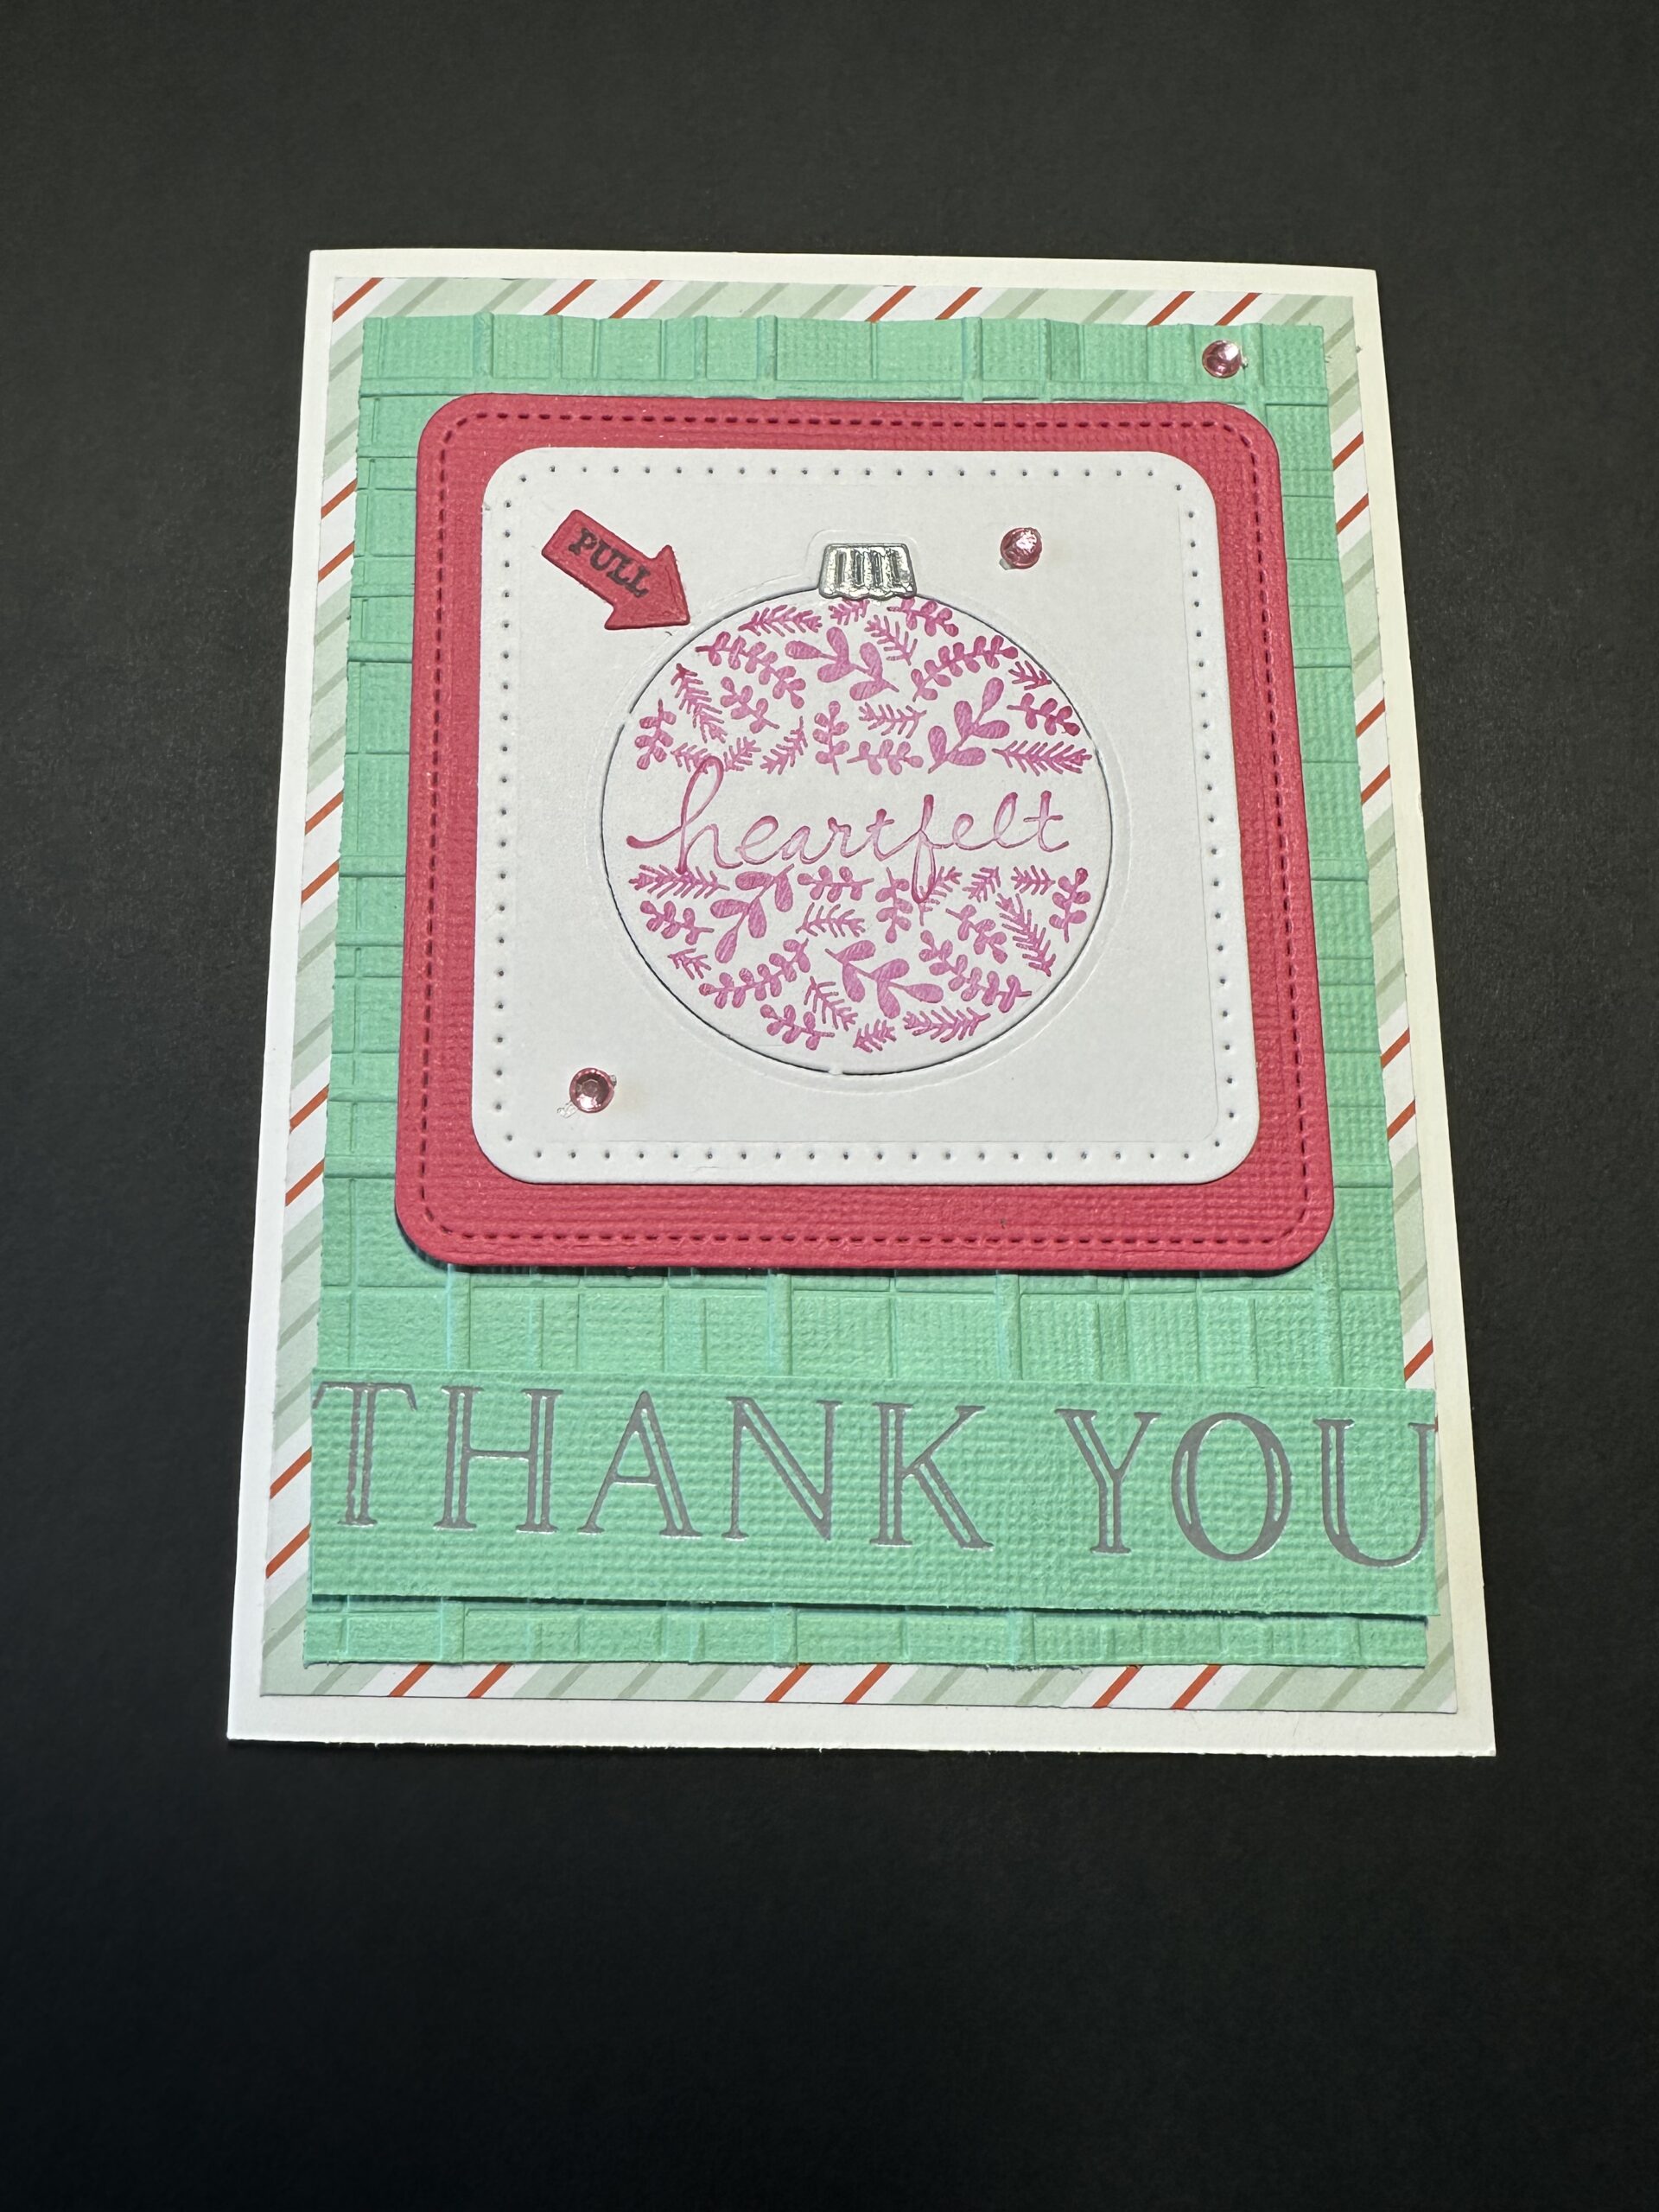
The Ornament die cuts the shape so that tabs are left like a pop out die cut ephemera and your card recipient pulls it off to reveal a message underneath! It is just so cool! I received this stamp and die set as a Christmas gift this year and you know I just had to play with it- Then I realized I could use it to make “Thank You” cards to send to friends and family to thank them for the Christmas gifts, time, energy and love they gifted me this year! I was so excited!
Key Highlights
- A Thank You card using the Hang an Ornament Bundle by StampinUp!
- A card using embossing folder, dies, inks and foil.


Supplies
- Stampin’ Cut and Emboss Machine- Stampin’Up!
- Forever Plaid Embossing Folder- Stampin’Up!
- Hang an Ornament Bundle – Stampin’Up!
- Coastal Cabana CS – Stampin’Up – trimmed to 3.75 x 5”
- Stitched Square Dies in sizes approximately 2.75” and 3”
- Misti Stamping Tool – not necessary but helpful
- Glimmer Hot Foil Machine – Spellbinders
- Glimmer Hot Foil- Satin Pastels/ Pink – Spellbinders
- ”Thank You” Hot Foil Plate-Essential Glimmer Sentiments- Spellbinders
- White Card Stock die cut with 2.75” stitched square die
- Pink CS die cut with the 3” square die
- Designer paper trimmed to 4 x 5.25”
- White Card Base size 4.25 x 5.5”
- Emboss the Coastal Cabana CS with the 3D Plaid Embossing Folder and set aside.
- Use the 3” square to die cut a square of CS that compliments your chosen designer paper: I used a piece of dark pink CS to compliment my designer CS that has light green and darker pink stripes.
- Use the Misti ( optional ) to stamp the ornament shape from the photopolymer stamp set, keep in place with magnets and stamp a sentiment that conveys a thank you – I used a stamp that says “heartfelt”. Then place the CS on the die cutting machine with the 2.75” square and die cut the white square.
- Place the 3” square in the same spot on the Misti and stamp the “hidden” sentiment that will be behind the ornament shape. I used a sentiment that says, “ it’s so nice of you to be so nice”. Don’t you just love that? You can use any sentiment stamp you have that fits the idea. It’s good to sort through your entire stamp stash looking for any kind of thankful sentiments. Sometimes we overlook possibilities with our stamp sets because they seem to be for certain occasions- but most of the stamps are interchangeable and work for many different occasions. The “heartfelt” sentiment came from a Stampin’Up! Set called “Lovely You” and the “it’s so nice…” stamp came from a Stampin’Up! Set called “Happy Hedgehogs”. Yes, I think most of my stamp sets are from Stampin’Up! As I love their products and have been a customer for many years.
- Use a small piece of Pink CS to die cut the arrow from the set and a small piece of metallic or glitter or just a complimentary color of CS to die cut the ornament topper if you so desire. Stamp the word “PULL” from the set on the arrow.
- Adhere the ornament topper onto the ornament shape and the “PULL” arrow onto the white square. Then adhere the white square onto the coastal cabana 3” square and set aside.
- Preheat your Glimmer Hot Foil Machine. If you don’t have a hot foil machine you should so go out and get one! Just Kidding- I mean, you’d love it but you don’t have to use foil for this card, you could simply stamp “Thank You” on a piece of CS to place on the bottom or stamp it on the inside of the card. This is crafting so it’s entirely up to you!
- Once the hot foil machine has heated and is ready, cut a piece of foil in pink or a complimentary color for your card and HOT FOIL your “Thank You” sentiment onto a scrap piece of Coastal Cabana CS and either fussy cut or die cut the rectangle to adhere to the bottom of the card.
- Now it’s time to assemble the greeting card! Adhere the designer paper to the card base, adhere the plaid embossed piece next, adhere the square assembly and then the “Thank You” sentiment to the bottom. Finish up with some sparkly gems or sequins or dots if you wish and you are done!
- I chose to lift the squares and the Thank You sentiment with some foam adhesive dots- again, entirely up to you.
- Don’t forget to write your message on the inside of your card, thanking them for their gift or time or food or whatever they contributed to your Christmas festivities!
I hope you have enjoyed our little make and thank you for joining me today at Kelli’s Kraft Studio! I’m always looking for reasons to craft something and making greeting cards is one of my favorite things. Making “Thank You” greeting cards and sending them to our loved ones is a way for we crafters to convey our gratitude for gifts received or for the time or energy someone gave us. Take these ideas and make them your own and always remember to Keep it Krafty! I can also be found and followed on Pinterest as KellisKraftStudio12.
Happy New Year 2025!!