
Using Your Cricut
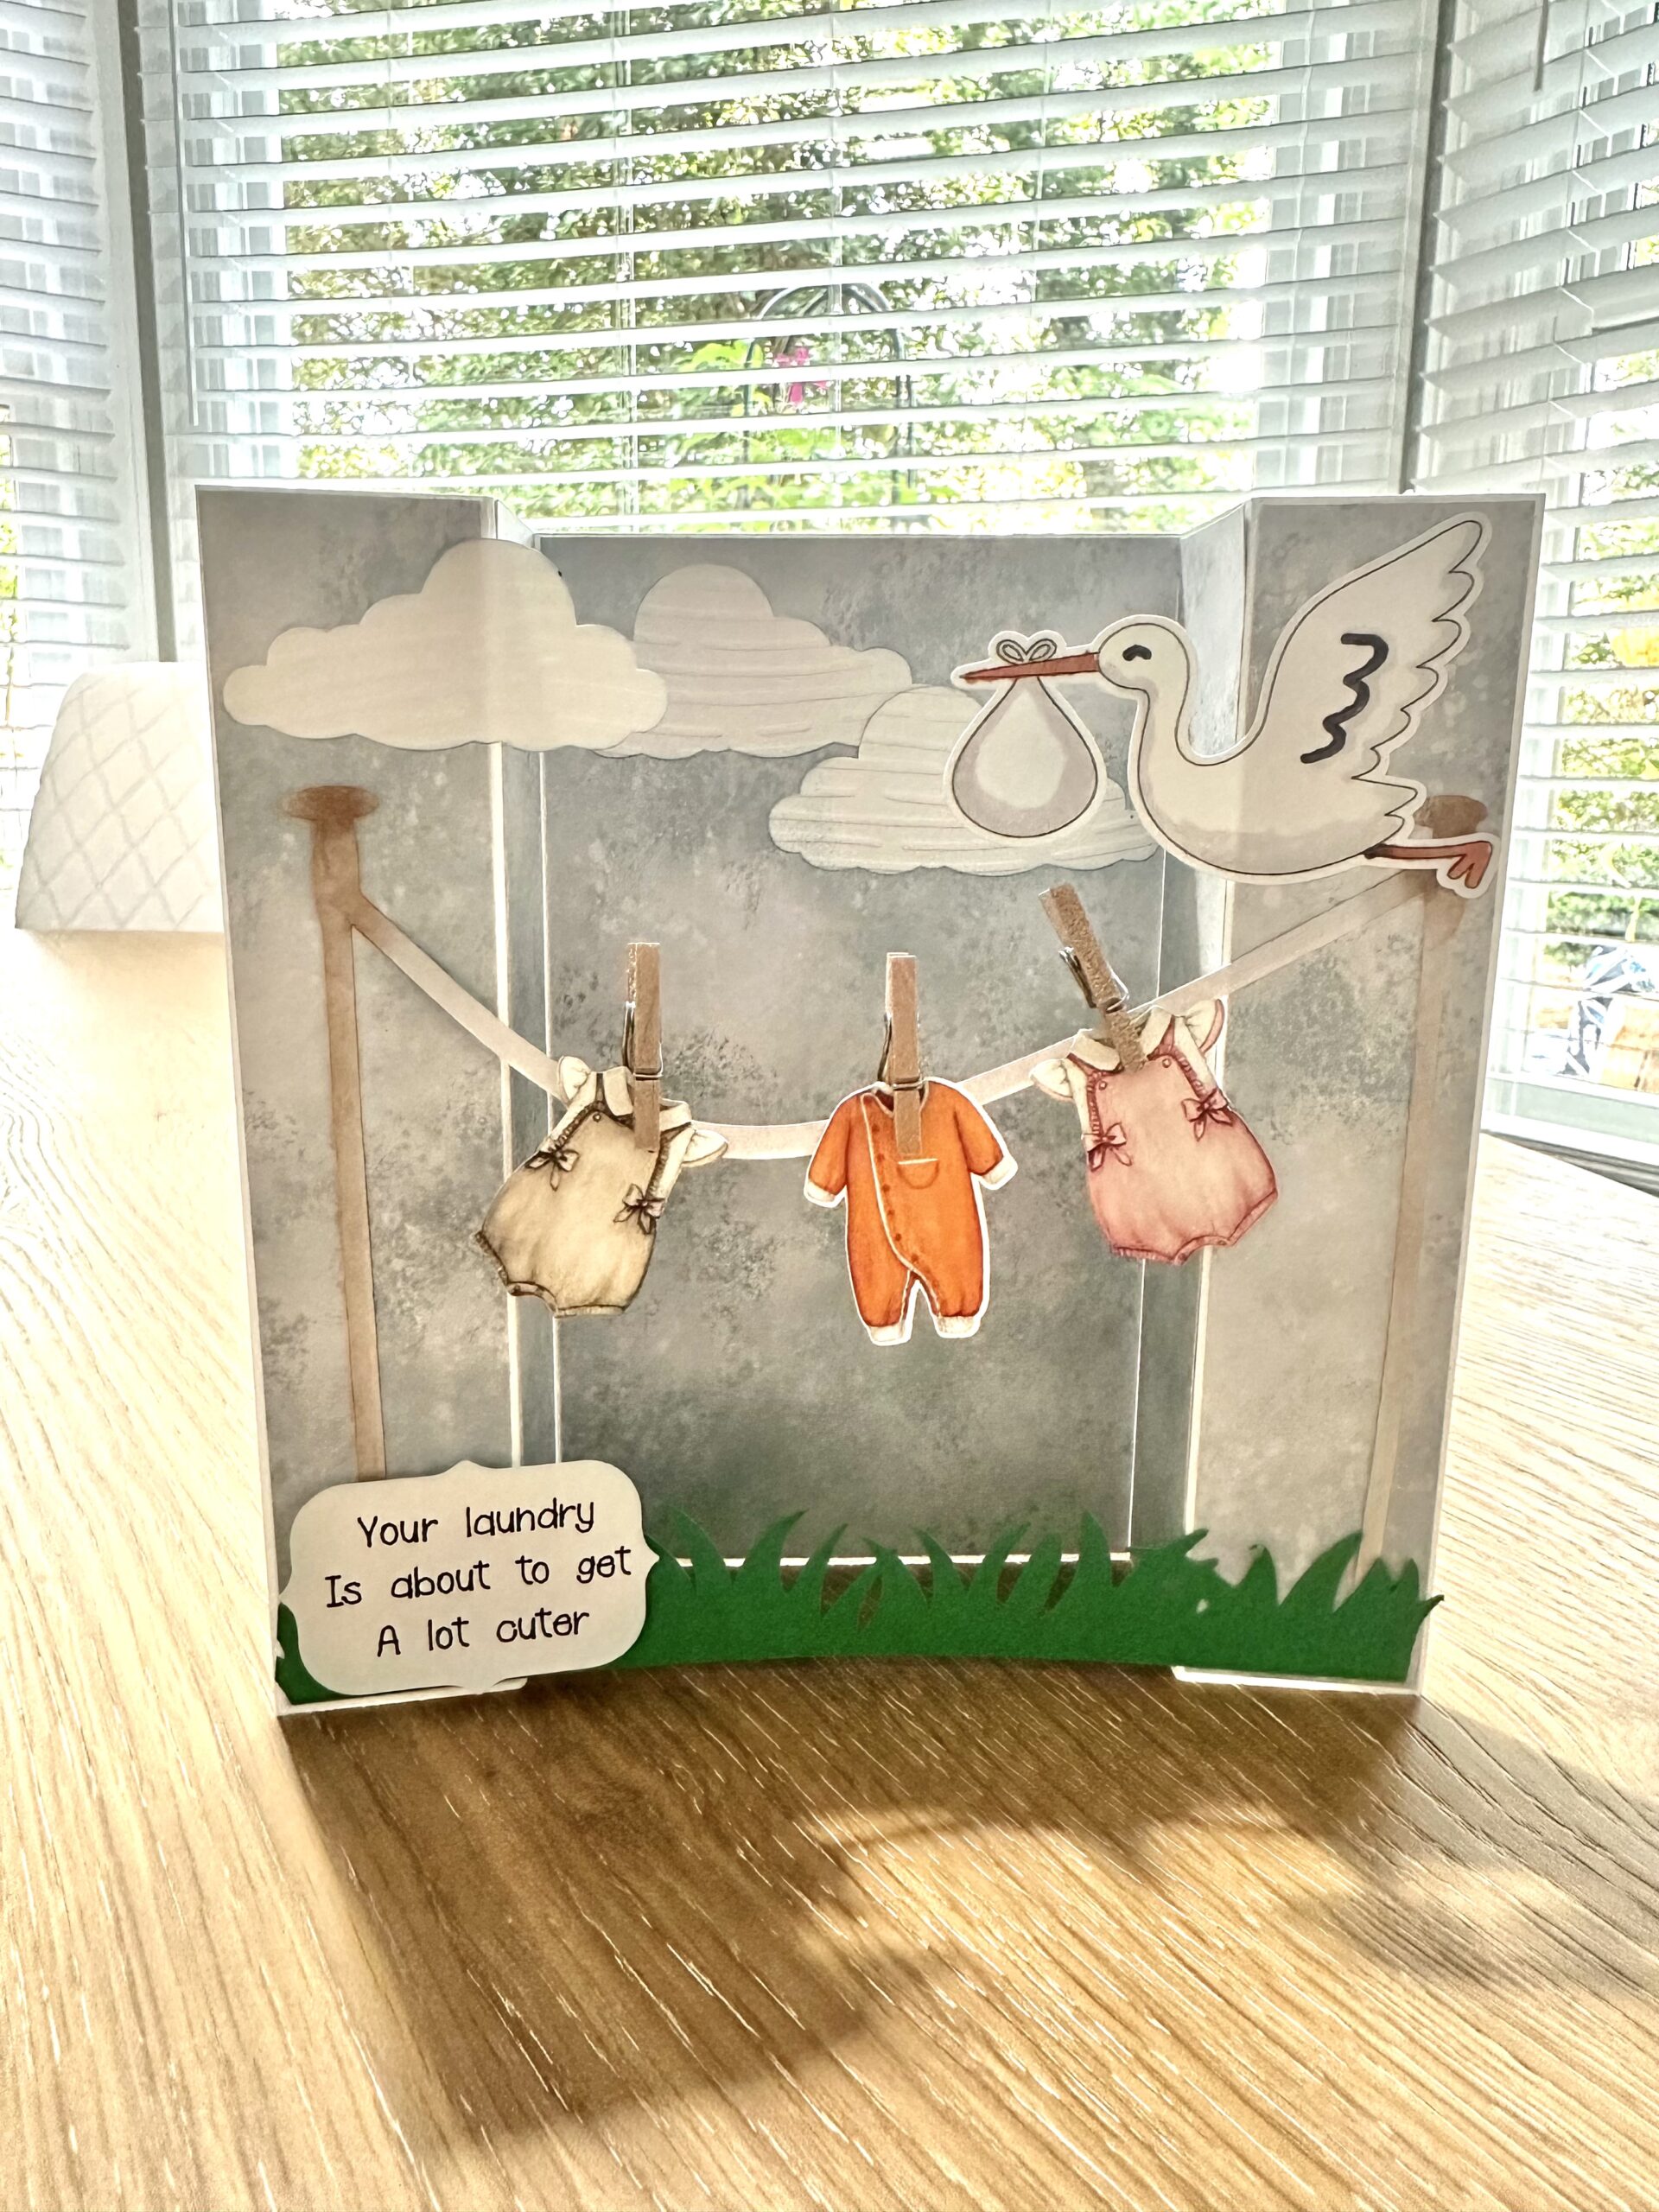
Hello and welcome to my studio. I’m so happy you are here today. Because I adore what I do and I just love sharing my ideas with you! And this awesome bridge fold card for baby is definitely worth sharing! Everyone who has received this card from me has been amazed. They just love it! It’s one of those cards you just want to stand up (and it stands up so well) and enjoy every time you walk by. Right, so we will be creating the base of this card using solid card stock and some patterned card stock. And all of the elements ( clouds, clothes line, baby clothes, stork etc. ) for this bridge fold card will be made using your Cricut smart cutting machine.
So dust off your Cricut and see how amazing it is as your everyday crafting companion! I know you were super excited the day you received your new Cricut. You may be that person who uses it weekly or you may be that person who has made a couple of vinyl decals and that’s about it. Yet your Cricut machine is an absolutely amazing tool for card making and paper crafting of all sorts. And I’ve shared all of the info for creating the base of this bridge fold card as well as a link to my FREE design in Cricut Design Space down below in the “Let’s Get Krafty” section. Next, I’ve shared a list of the supplies I used to create this awesome bridge fold card for baby. So, without further ado, let’s get krafty!

List of Supplies
- 8.5 x 11” Solid Card Stock: White and Grass Green
- 6×6” Patterned paper: “Cloud Cover” : In Color DSP from Stampin’Up HERE
- Glue
- Paper Trimmer with Scoring Tool
- Cricut smart cutting machine
- Printer for the “Print Then Cut” Baby Clothes
- Cricut Ink Pen: for the sentiment
- Tiny Wooden Clothes Pins: Craft Stores or Online
- Light Blue and Light Brown Ink Pads
- Ink Blending Tools
- Alcohol Markers
Want more card making & crafting inspiration?
Follow me on social media
Let’s Get Krafty
Making The Card Base
Right, let’s make the base of this awesome bridge fold card for baby. Take a piece of white card stock and trim it to { 6 x 8.5” }. Score the long side @ { 1.25, 2.5, 6 and 7.25” }. Now fold and burnish your score lines. Next, we will trim the designer papers to decorate the front and the back of this bridge fold card. Trim a piece of the DSP in the aptly color-named, “Cloud Cover”. I chose to use the blotchy piece for the front of the card because it resembles a cloudy sky. And I chose one of the papers with stripes for the back of the card. Trim the designer paper layers: you’ll need 8 strips trimmed to { 1” x 5.75” }. You’ll need 2 pieces trimmed to { 3.25 x 5.75” }. See photos below. We will create the “BRIDGE” part of this card later using our Cricut. Also, for this card, there are actually 2 bridges, the grass at the bottom and the clothes line near the top. Next, we’ll make all the decorative elements for this bridge fold card.


Making The Decorative Elements
To make the decorative elements for this sweet bridge fold card, we’re going to use our Cricut! The Cricut will “Print Then Cut” the baby clothes and the storks, “write and cut” the sentiment and cut three clouds, the clothes line and the grass border. Then we will use some ink to color and shade some of these pieces. After that, we will create the Scene of this card by adhering these elements to the base of the card. And let me just say, this is so much fun! I know, I always say this and it’s always true! I’m sharing with you my FREE design in Cricut Design Space. So all you have to do is click on the link. Then once you arrive at Cricut Design Space, you simply click “Make It”! And your machine will guide your steps. Once you’ve created your elements, you get to have fun with coloring, shading and building your card!


HERE’S THE LINK
FREE DESIGN IN CRICUT DESIGN SPACE
Keeping It Krafty
In closing, I’d like to thank you again for joining me here today. This awesome bridge fold card for baby is so much fun to make! And it’s simpler to make than it may seem. Just follow the steps, make the base, decorate the base. Create your own decorative card stock elements using your Cricut. Do a bit of coloring and glueing. Finish off by hanging your adorable little baby clothes on the clothes line using some tiny wooden clothes pins and that’s it! We have made this awesome bridge fold card that measures 6×6” and folds flat to fit inside a 6×6” square envelope. This card is probably best hand delivered. If you need to mail this card-I suggest you place the card and envelope inside of a larger padded mailing envelope. Because the clothes pins will probably not make it through the postal sorting machines. And as normal, you have so many options for creating a bridge fold card. Just use your imagination. So no matter what it is that you decide to make just make it your own. And always remember to keep it krafty!
Until next time,
WANT TO SEE MORE?
VISIT MY BLOG ARCHIVES
