
Craft a Designer Set of Cards & Matching Box
Hello and welcome to my studio! I’m so happy to have you here today. I love what I do and I so enjoy sharing my ideas with you. And today I’m sharing with you this sweet designer boxed set of cards.
Now, I went into this idea thinking it was going to be a bit more difficult and time consuming than my average projects. However, I was happy to discover it’s a very simple project that came together rather quickly and easily. I’m so excited to share this idea because it’s absolutely perfect for gift giving. Mother’s Day is just around the corner, and this will make a great gift for MOM. Yet this designer set of cards and matching box is versatile enough to make a fantastic gift for just about anyone.
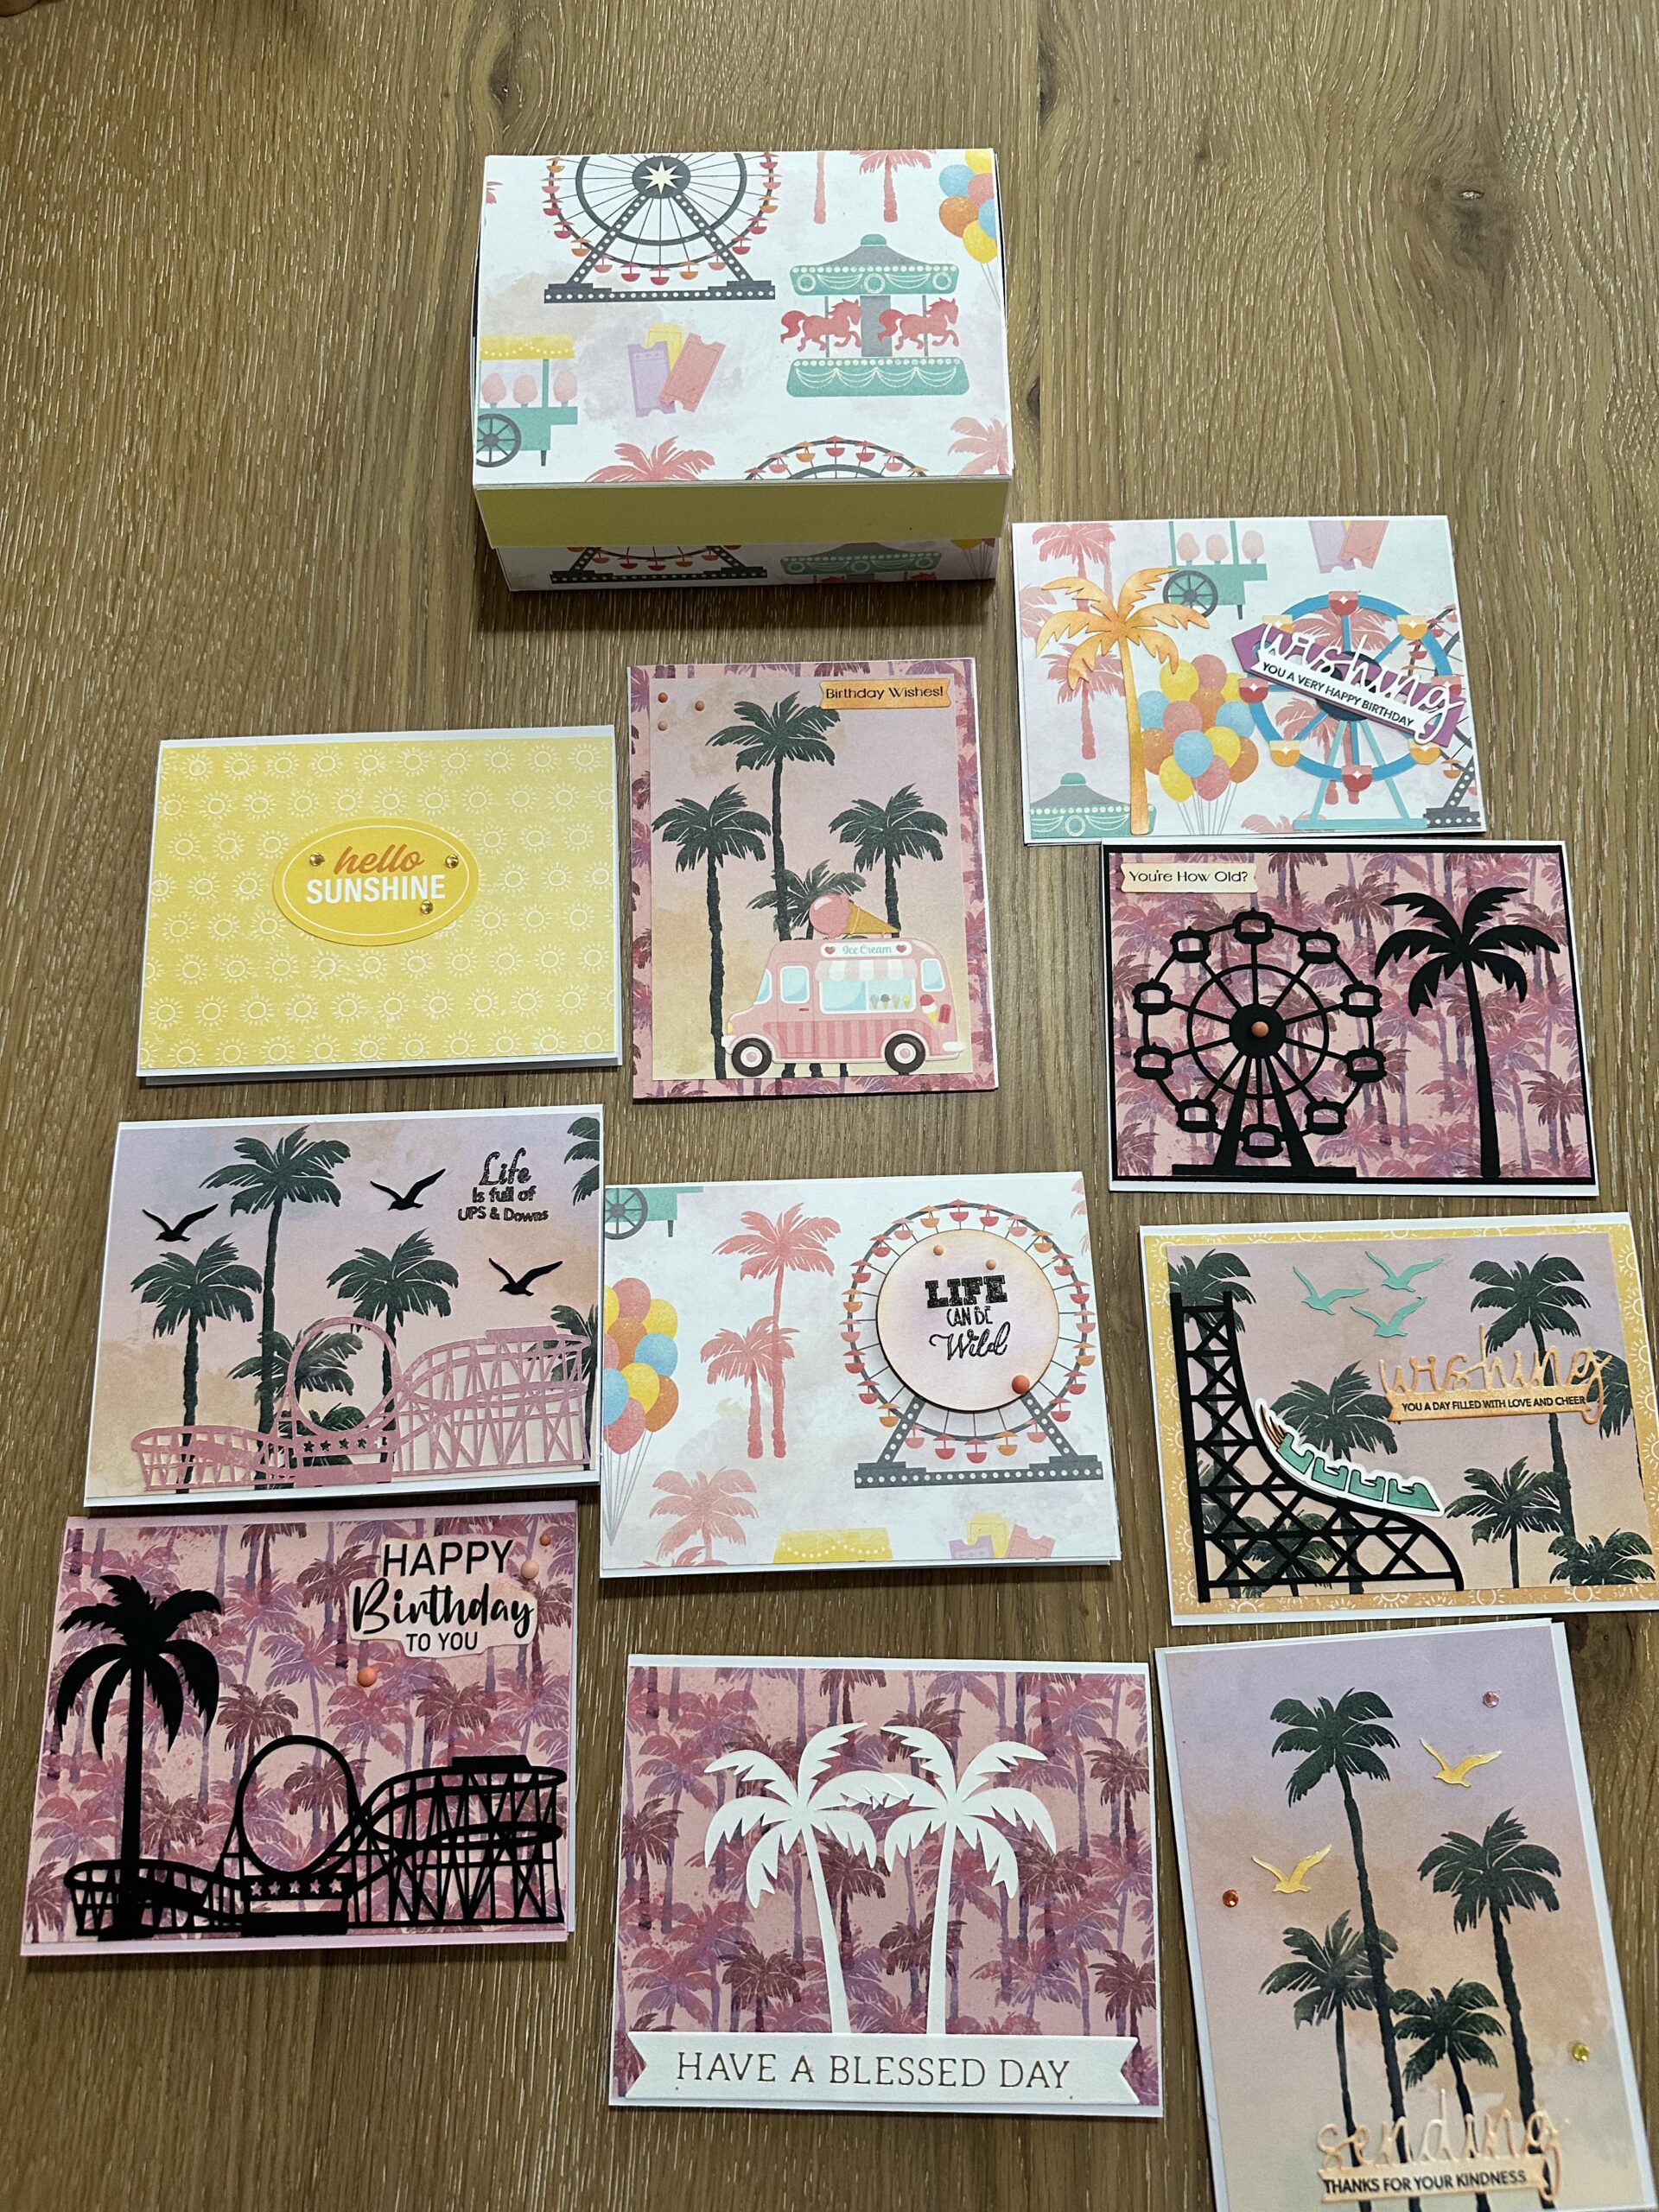
Also, the finished size of the box is 4.5” wide by 6” long by 2” deep. And it holds at least 10 cards with envelopes, nicely. And the key to this project’s simplicity is the designer papers! These papers really do all the work and that gives us more time to add some fun designs and embellishments. I know I always say this, but making this designer boxed set of cards is just So. Much. Fun!
However, it’s important to remember you do not have to use the same paper I did. The paper I used for this project is called “Beach Boardwalk”, from Stampin’Up! It’s from their 2025-2026 catalog. And I see that their new catalog is coming out soon and this paper plus their coordinating stamps and dies are on sale now as a last chance item. Keep reading below, as I’ve shared a list of the supplies I used to make this project along with a simple tutorial for making the box as well as photos of the cards I made to go inside. These photos can help inspire you as you create your own sweet designer boxed set of cards. So, without further ado, let’s get krafty!

List of Supplies
- Card Stock-I suggest Heavy Weight (130 lb/350gsm)OR Poster Board [for the box]
- Designer Paper- 12×12”: I used “Beach Boardwalk” from Stampin’Up- HERE
- Stampin Up also has a die set that coordinates with this paper-HERE
- Good Double Sided Adhesive (like Tear & Tape)- HERE
- Paper Trimmer
- Scissors
- Blank White A2 Cards
- White A2 Envelopes
- Glue
- Various stamps, dies, card stock ephemera, stickers, embellishments
- Velcro Dots or small magnets (for the box flap closure) I used Velcro Dots
Want more card making & crafting inspiration?
Follow me on social media
Let’s Get Krafty
- First, choose your papers. You can use 6×6, 8×8 or 12×12” papers for all the cards and the box because the widest trimmed paper is 6 inches. The key is to choose a paper pack because, then, all of the papers will coordinate. And that creates a uniform Designer Set of Cards & Box.
- Next, let’s make the box itself! I took a look at some boxes for sale online and this style is very popular. And, lucky for us, it’s pretty easy to create! By the way, the boxes online sale for about $6 or more and it’s difficult to find the right size. This box will cost far less as it uses just 3 sheets of paper and a bit of glue to make.
For the Base
- Trim a piece of heavy CS to 8.5 x 10”. And Score all sides at 2”.
- Fold and burnish the score lines.
- Use scissors to cut on the score lines as shown in the photos below. This creates the tabs for your box.
- Place adhesive on the four tabs you created and fold up to create the box. The completed dimensions of the base will be 4.5 x 6 x 2”.
Check Out The Slideshow Below


For the Lid
- Trim another piece of heavy CS to 6 x 12”. And Score @ { 4.5”, 6.5” and 11” }.
- Fold and burnish your score lines. This creates the lid for your box.
- You will attach the 4.5” rectangular section that does not have the 1” section beside of it, to the bottom of the base of your box using glue or a really good double sided tape.
- Add the adhesive to the 2” rectangular section to the back of the base of the box.
Decorate Your Box

- Choose your Designer Paper. This will be from the same pack as you use for the greeting cards that will go inside of the box. These papers can be found at most craft stores and online craft stores. I used the paper pack called, “Beach Boardwalk” from Stampin’Up! They have lots of lovely paper. The next project I share will be another boxed set and for that set I’m using a pack called “Silly Goose” by Carta Bella- I purchased from Scrapbook.com.
- Take whichever paper you’d like to adorn your box and trim 2 pieces to 4 3/8 x 5 7/8”. ( or just shy of 4.5 x 6” ). These are for the top and the bottom of your box.
- Trim 2 pieces to just shy of 2” x 4.5”. These are for the sides of the box.
- Trim 1 piece to just shy of 2” x 6”. This is for the front of the box.
- Trim 1 piece to just shy of 1” x 6”. This is for the front closure flap of the box.
- Now adhere all of your designer paper to your box.
- Lastly, add your little Velcro dots or small magnets to the inside of the small flap. This will hold the box closed.
- That’s it! You have now made your very own designer box that will be part of your sweet designer boxed set of cards. Congratulations!
Let’s Get Krafty
Check Out The Slideshow Below


Decorating The Cards
- Choose the papers you are going to use as your card fronts. They don’t all have to be the same design, but they should match. Buying designer paper packs makes this part a breeze, because the companies have done all the work for us.
- Decide how many cards you’re going to make. I know this box will hold more than 10 (4.25 x 5.5”) cards and envelopes.
- So now, trim your designer paper for your card fronts. Each one will be trimmed to 4 x 5.25”. You can get 6 card fronts from 1 sheet of 12×12” designer card stock!
- Adhere your designer panels to the fronts of each of your card bases.
- Decorate your little heart out! This is so much fun! So, whatever theme you’re using, go with it. Choose stamps, dies, card stock stickers, regular stickers, shiny gems and any other bits and bobs to adorn the cards of your sweet designer card set.
- I used various stamps and dies, card stock stickers as well as my own designs I created using my Cricut. I never purchased the stamp and die sets that was offered with this paper from Stampin’Up, so I used what I had or made my own card stock ephemera with my Cricut machine. If you’d like to see more about how I do that, check out my post from last week, HERE.
- Did I tell you how much fun this is? I know I did and I’ll say it again. THIS IS SO MUCH FUN!
WANT TO SEE MORE?
VISIT MY BLOG ARCHIVES
Keeping It Krafty
In closing, I’d like to thank you, again, for joining me here today. This sweet designer boxed card set is such a fun and rewarding project to make. It makes a really nice gift for just about anyone. Because we all have those times, several times a year, when we NEED a greeting card. And a hand-made designer box filled with hand-made designer all occasion cards will be sure to WOW your loved ones.
Also, I want to mention that the paper I used is from Stampin’Up and I’ve been hoarding it, as usual, for months. They are just now going into their new catalog, so if you want this paper, “Beach Boardwalk”, it’s only going to be available for a bit longer I think. Keep in mind you do not have to use the same paper as I did! There are loads and loads of beautiful designed paper packs in the crafting world. In fact, next weeks post will be another boxed set using different paper. So, no matter what it is that you decide to make just make it your own. And always, always keep it krafty!
Until next time, bye-bye!
